contact us

Use the form on the right to contact us.

You can edit the text in this area, and change where the contact form on the right submits to, by entering edit mode using the modes on the bottom right.


123 Street Avenue, City Town, 99999

(123) 555-6789

email@address.com


You can set your address, phone number, email and site description in the settings tab.
Link to read me page with more information.

Blog

Butteryum food blog recipes

Filtering by Category: egg recipes

Tamagoyaki

Patricia @ ButterYum

tamagoyaki_butteryum

One of our daughters studied abroad in Japan and she introduced us to many new foods. Enter Tamagoyaki, a Japanese rolled omelet. Traditionally, the egg mixture is seasoned with soy and mirin for a salty/sweet vibe, but being Americans, we prefer our egg mixture seasoned with just a little salt and pepper. Either way, the technique is the same so let’s head into the kitchen to make some Japanese rolled egg omelets.

fullsizeoutput_3f23.jpeg

The technique is simple. For this demo, I’ll be using beaten egg and nori. Sometimes we also add sliced cheese (definitely not traditional, but very tasty). Also, a tamagoyaki pan helps, but you can certainly use a small round skillet instead.

DSC_1194.JPG

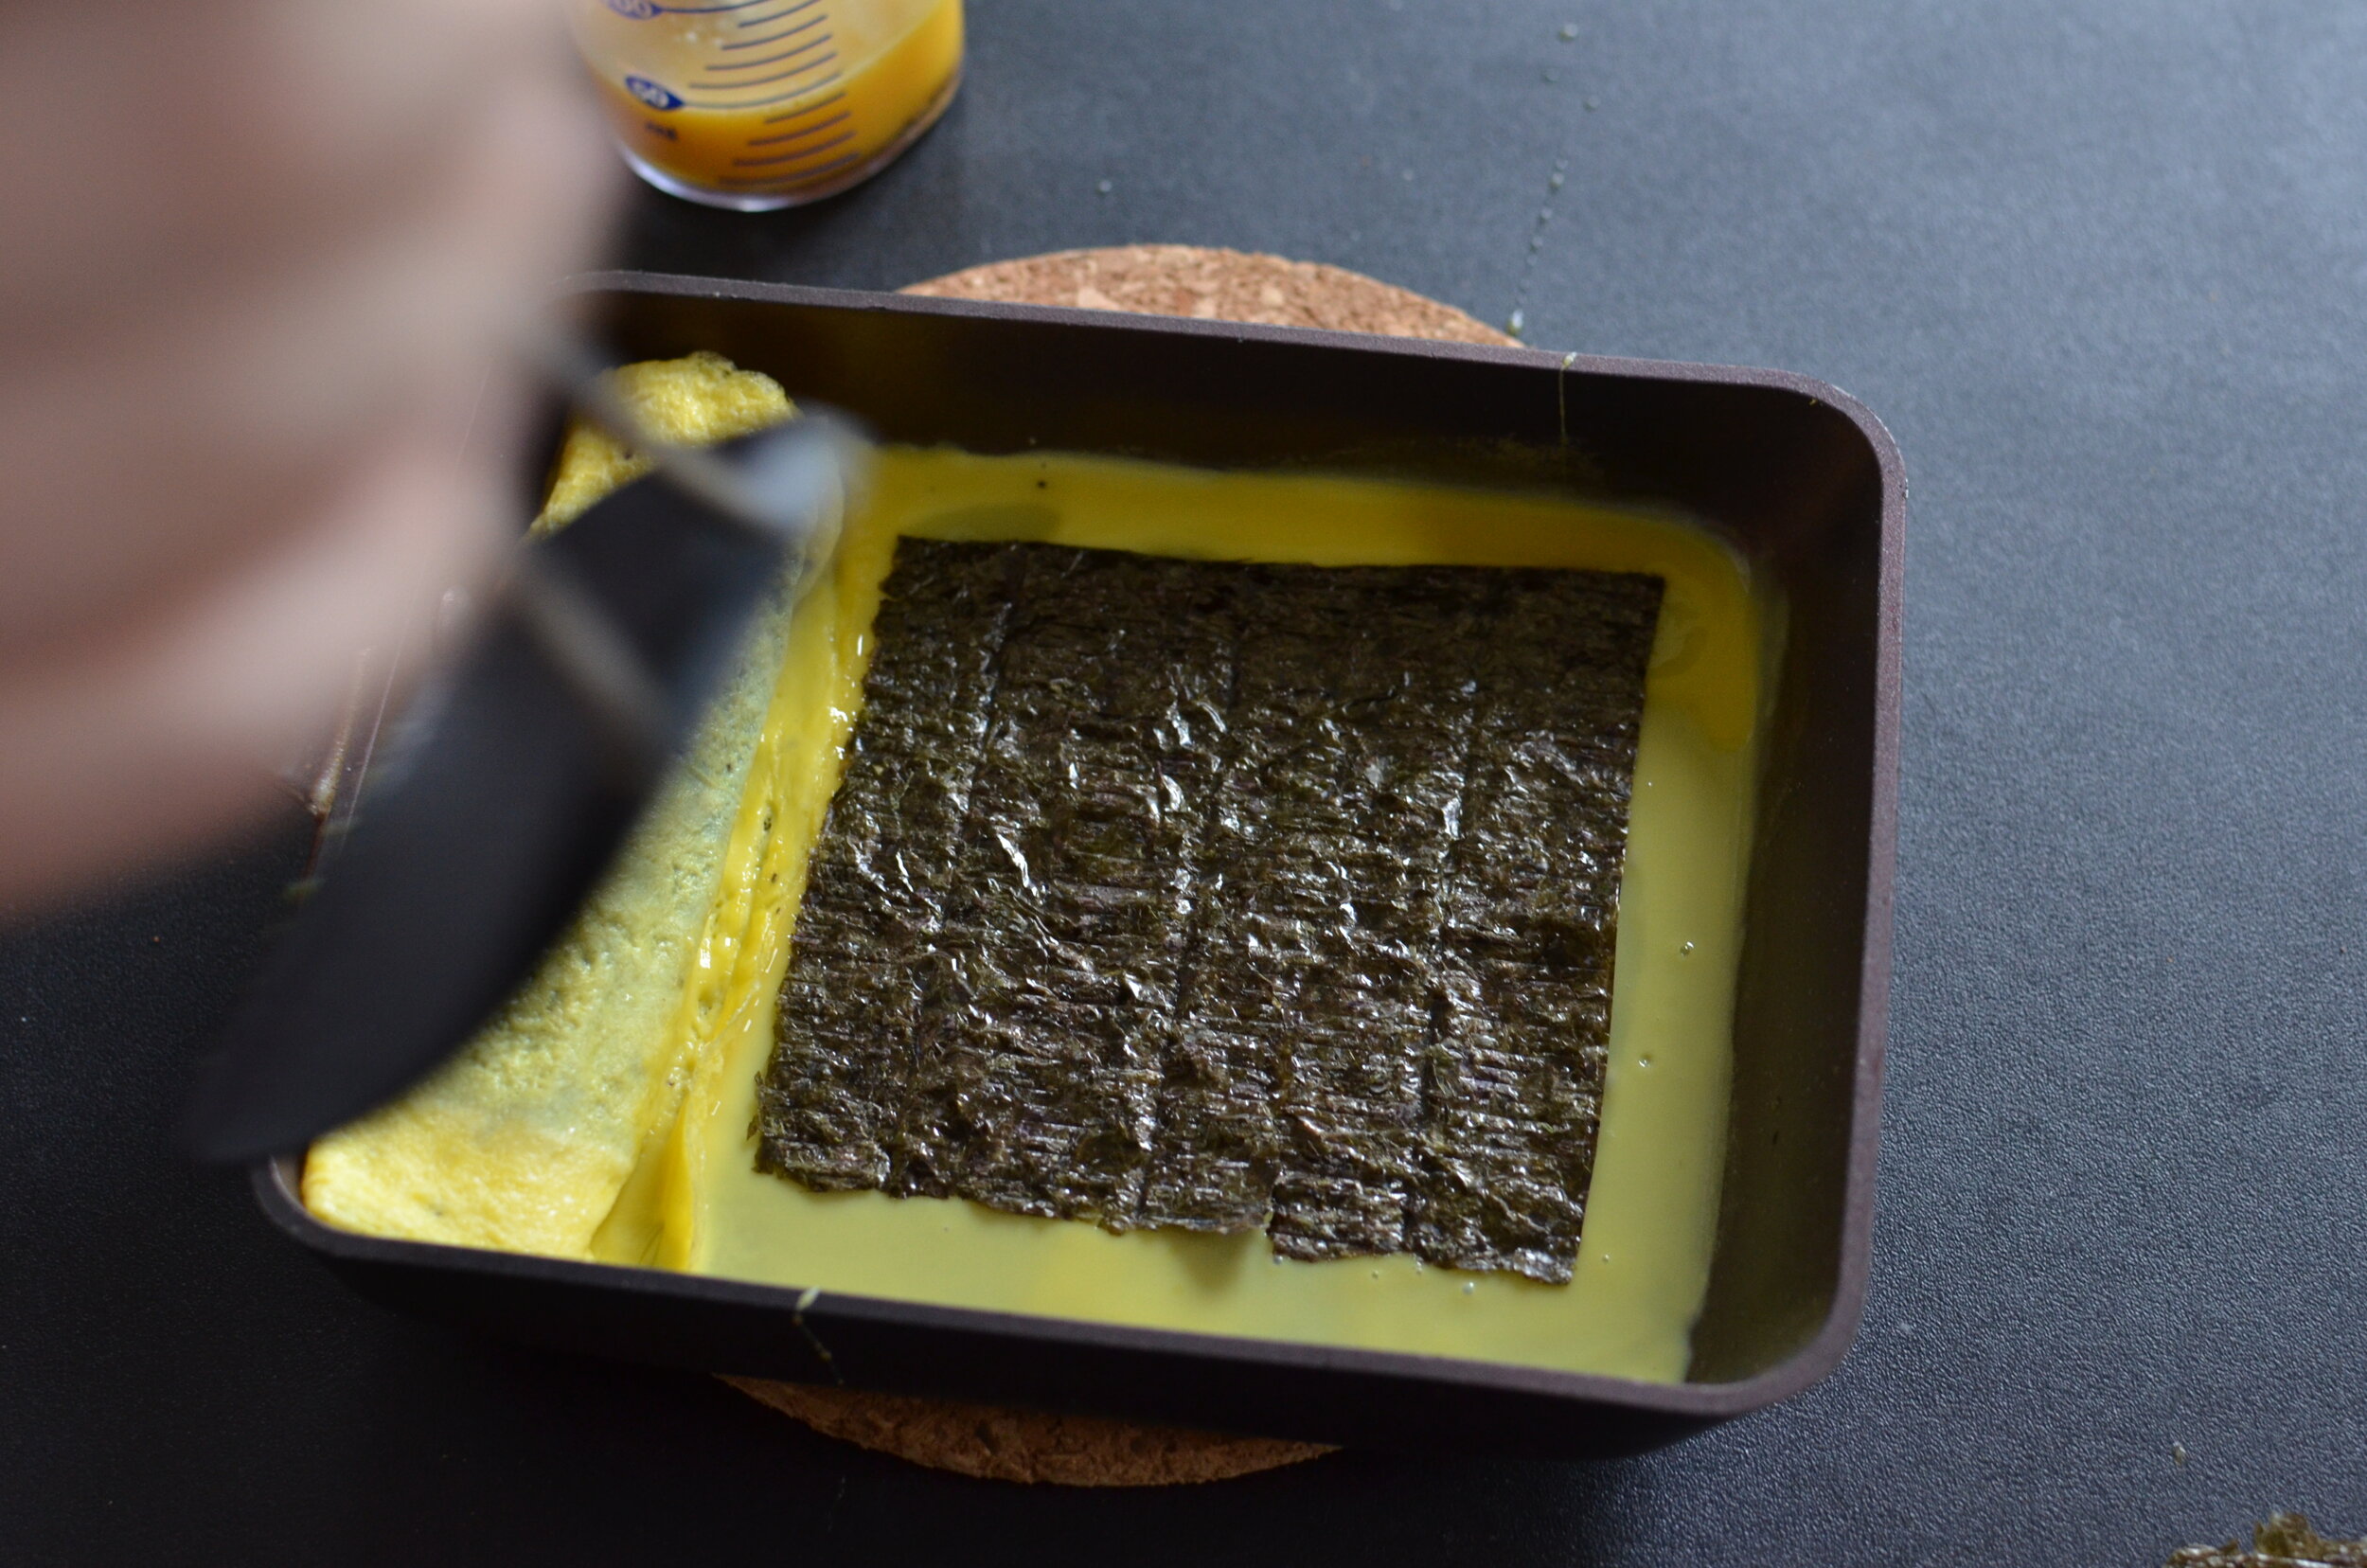
For this rectangular tamagoyaki pan, pour about 1/4 of the beaten egg mixture into the pan and swirl it around until the bottom of the pan is completely covered. Cook over medium heat until the layer of beaten egg is set, then use chopsticks (or a spatula) to roll the omelet up.

DSC_1201.JPG

Slide the rolled egg to one side and add another 1/4 of beaten egg, being sure the beaten egg touches the already rolled egg.

DSC_1204.JPG

If desired, add a quarter sheet of nori (and if you like things cheesy, place a slice of white American or Muenster cheese under the nori).

When the 2nd layer of egg is set, roll again.

DSC_1210.JPG

Slide the rolled egg to one side and prepare for the next layer….

DSC_1212.JPG

1/4 egg mixture followed by another 1/4 sheet of nori (and cheese if using).

DSC_1217.JPG

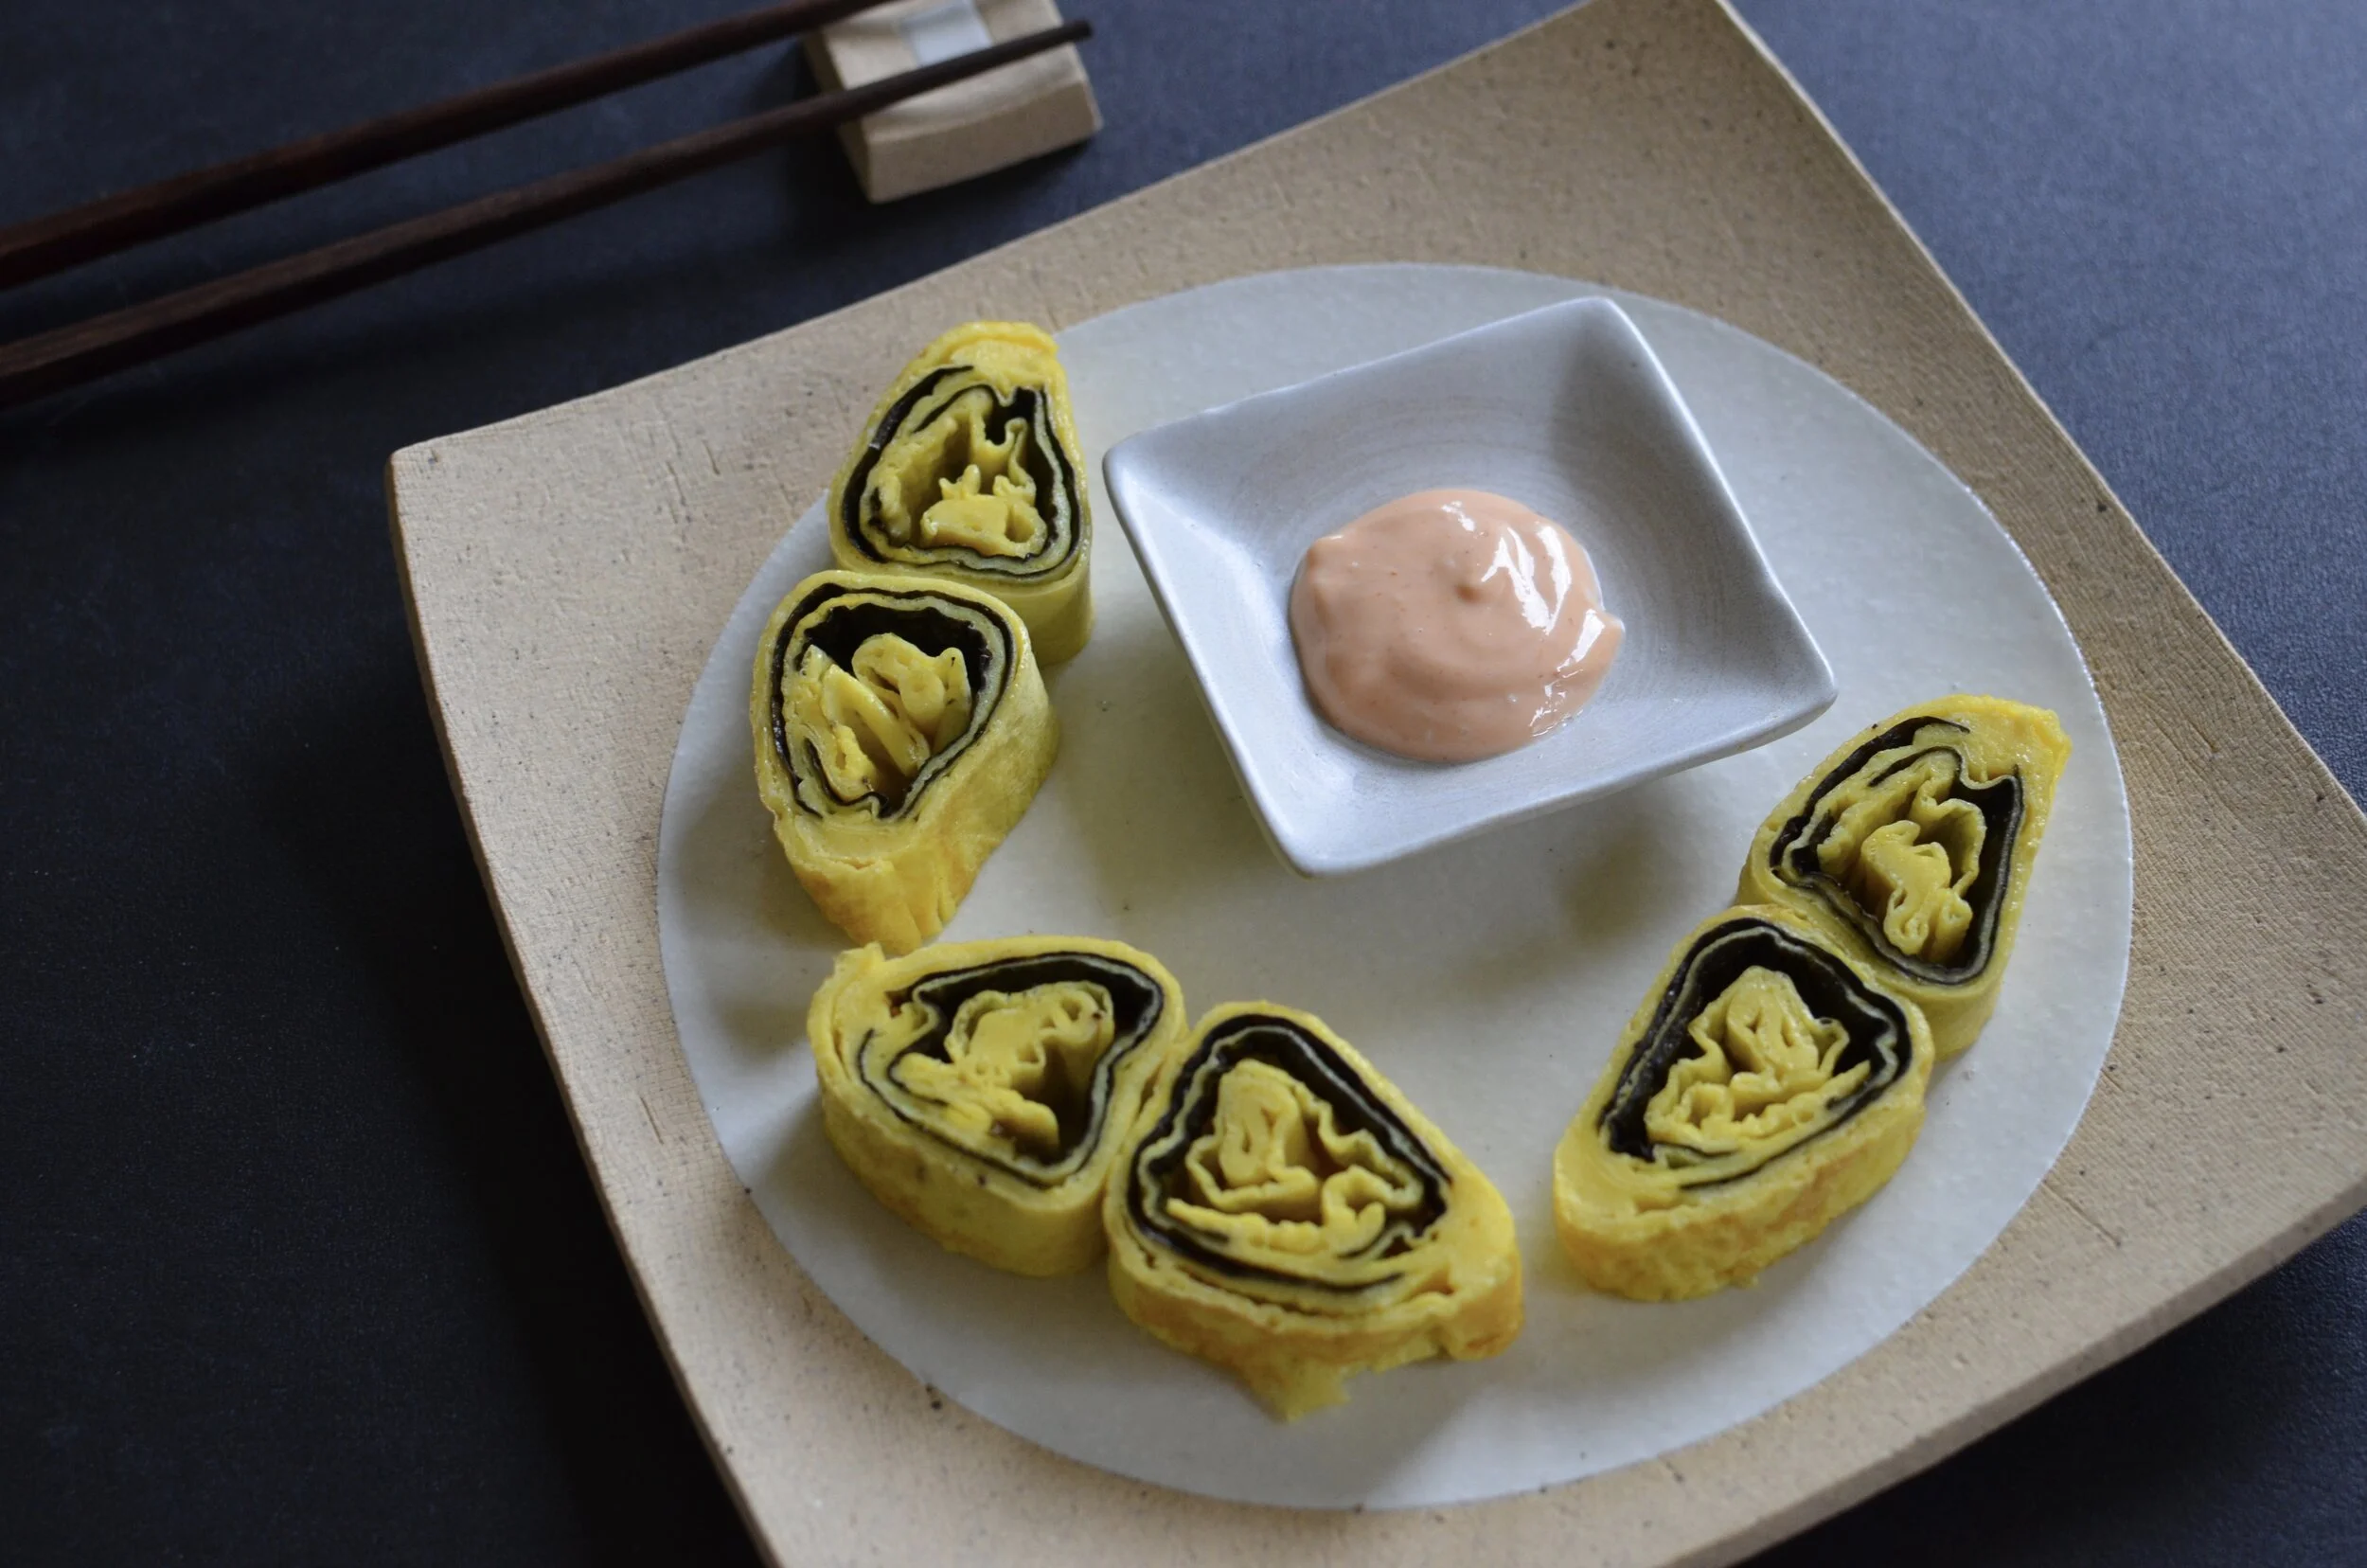
Since the nori is visible through the egg layers, we don’t add any nori for the last of layer of beaten egg.

DSC_1219.JPG

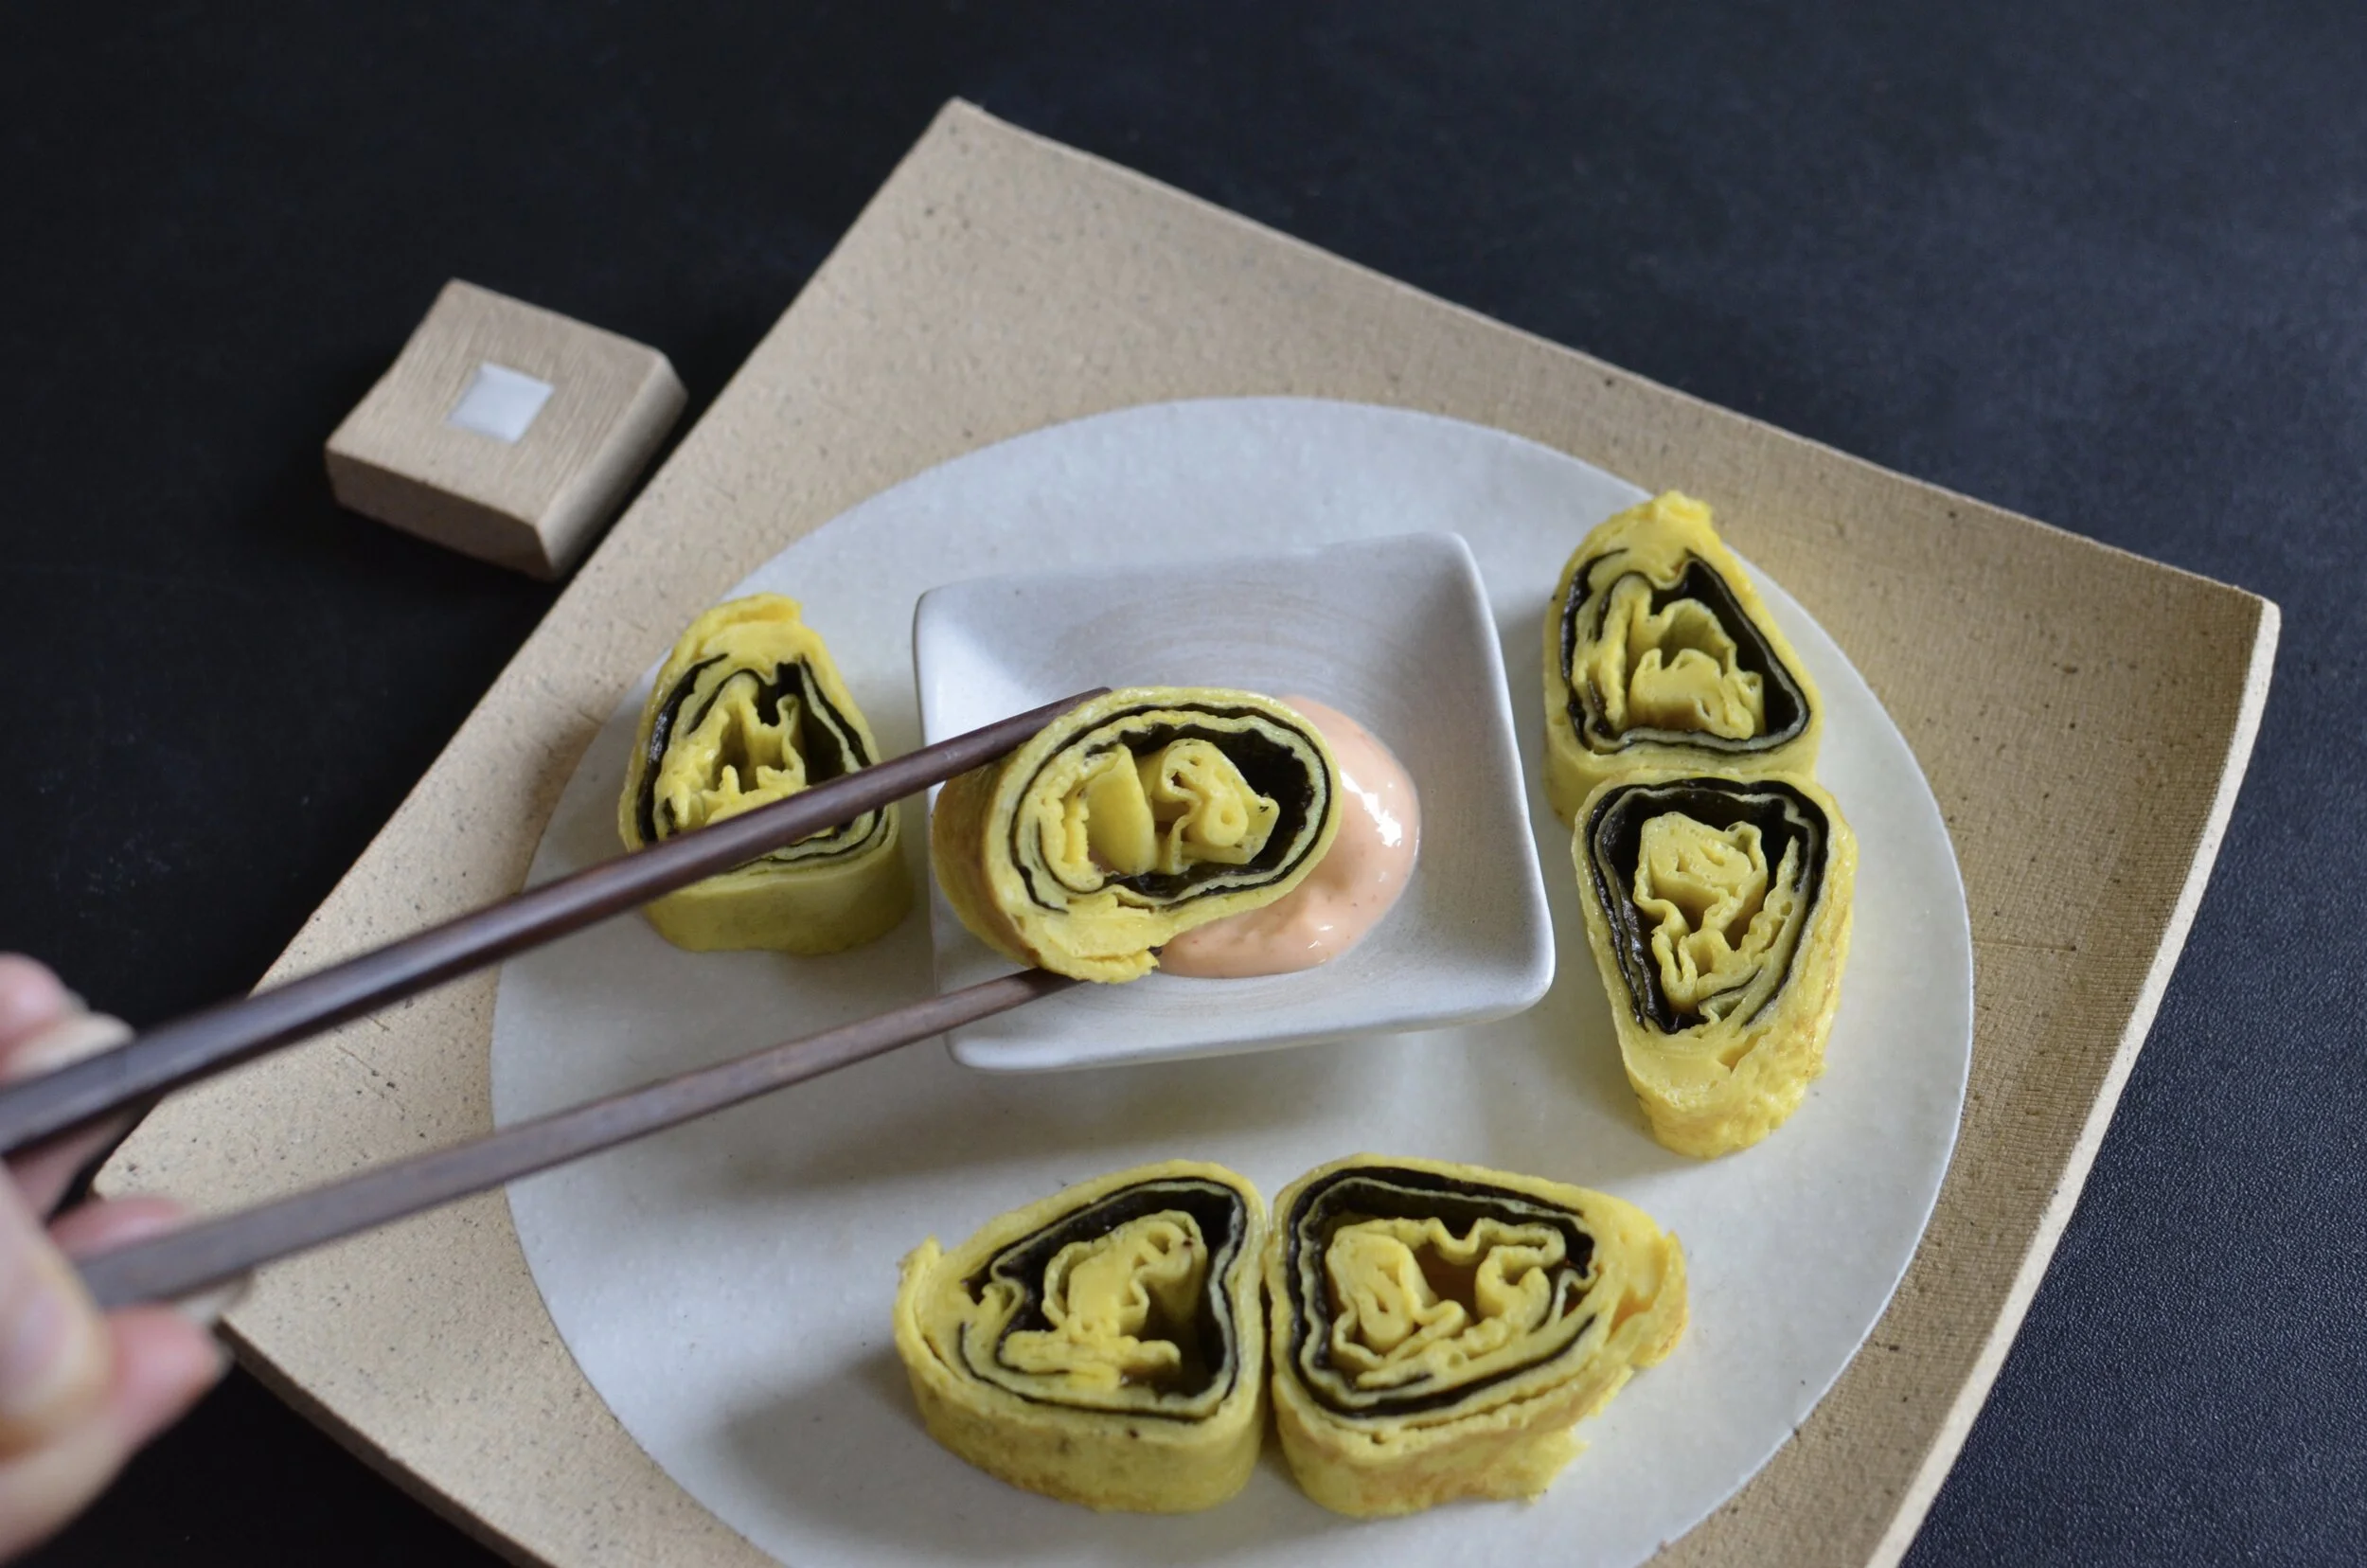
Pretty. Transfer the rolled omelet to a cutting board and cut into slices like sushi.

fullsizeoutput_3f25.jpeg

To serve, we like to make a dipping sauce of Japanese mayo and Sriracha. If I have any, a sprinkling of chopped scallions or chives are also good. Enjoy!

Items used to make this recipe:

(affiliate links)


Tamagoyaki

makes 1 rolled omelet

Printable Recipe

Ingredients

  • 2 large eggs

  • 1/2 sheet nori sushi wrapper, broken into 2 squares

  • salt and pepper to taste

  • (optional) sliced cheese, Japanese mayonnaise, Sriracha, sliced scallions or chives

Directions

  1. Beat 2 eggs and add salt and pepper to taste.

  2. Heat nonstick tamagoyaki pan over medium heat and pour 1/4 of the beaten egg into an even layer; when set, roll layer from one end to the other.

  3. Add another 1/4 of the egg mixture in an even layer, being sure the new layer touches the previously rolled egg; top with 1/4 sheet of nori.

  4. Continue steps 2 and 3 until all the egg is used.

  5. Place rolled omelet on cutting board and slice into sushi-like pieces; serve with sauce if desiered.

Note

Oven Baked Egg Bites

Patricia @ ButterYum

ButterYum - Oven-Baked Egg Bites (like Starbuck’s Sous Vide Egg Bites). how to make Starbucks egg bites in oven. Starbucks egg bites recipe. how to make Starbucks egg bites. how to bake Starbucks egg bites.

Here’s my copycat version of Starbuck’s Sous Vide Egg Bites, only instead of cooking them in a sealed hot water bath (sous vide), mine are baked in the oven so anyone can make them. In all honesty, I haven’t tried the Starbuck’s egg bites, but my kids have and they say these are equally delicious. You be the judge.

oven-baked-egg-bites-in-silicone-liners-butteryum

Start by lining a high quality cupcake pan - I HIGHLY recommend these 100% food-grade silicone cupcake liners because eggs are notoriously sticky and they’ll bake onto the metal pan like cement. These liners can be reused over and over and over, and you don’t even have to spray them with nonstick cooking spray. The egg bites will slip right out of them, I promise. ***Be sure read the bottom of this page to learn how to choose the right silicone liners.

Back to the recipe - to ensure an even distribution of ingredients, I like to divide the bacon and half of the scallions evenly among the 12 silicone liners…

egg-bite-recipe-butteryum

Then place the eggs, cottage cheese, heavy cream, 3/4 cup shredded cheese, and sriracha (or ketchup if you don’t like spicy heat) in a bowl. I used a wide bowl so I could get photos, but you should choose a bowl that is more deep than wide to minimize splashing (even better, use a quart size deli container).

better-than-egg-bites-recipe-butteryum

Use an immersion blender to combine the egg mixture. The cheese does not need to be completely blended - it’s fine if small bits remain.

Alternatively, a blender may also be used to combine the ingredients, but blenders tend to incorporate a lot of air so be sure to mix on low speed and allow the mixture to rest for about an hour before using, to allow the air bubbles to dissipate.

easy-egg-bites-recipe-butteryum

Pour the egg mixture evenly into the silicone liners.

how-to-make-egg-bites-at-home-butteryum

Top with the remaining cheddar cheese and scallions.

homemade-egg-bites-in-oven-butteryum

Bake in preheated oven for 15-20 minutes. Rest for 5 minutes before serving. Enjoy!

Items used to make this recipe:

(affiliate links)


Oven-Baked Egg Bites

makes 12 egg bites

Printable Recipe

Ingredients

Filling:

  • 6 ounces bacon, cooked and crumbled

  • 2 scallions, sliced

Egg Mixture:

  • 4 large eggs

  • 3 ounces shredded cheddar cheese

  • 1/2 cup 4% cottage cheese

  • 1/4 cup heavy cream

  • 1 tablespoon sriracha (or ketchup)

Garnish

  • 1 ounce shredded cheddar cheese

  • 2 scallions, sliced

Directions

  • Preheat oven to 400F and place rack in center position.

  • Line a high quality cupcake pan with 12 silicone liners (see note below on choosing the right silicone).

  • Divide bacon and 2 scallions among the liners.

  • In a deep mixing bowl of quart-size deli container, use an immersion blender to combine the eggs, cottage cheese, heavy cream, 3 ounces of shredded cheddar cheese, and sriracha.

  • Pour the egg mixture evenly into the silicone cupcake liners,

  • Top each with the remaining cheddar cheese and scallions.

  • Bake for 15-20 minutes; remove from oven and rest for 5 minutes before serving.

Macros: each egg bite contains 126 calories, 8g protein, 10g fat, and 1g net carb.

Variations

Salmon and Capers - For the filling, use 1/2 ounce of cooked salmon and 1/2 teaspoon drained capers. For the egg mixture, omit the sriracha, and add 2 tablespoons onion and chive cream cheese and 1 teaspoon ground black pepper Garnish with sliced scallions before baking (no cheese). Smoked salmon can be used, but reduce to 1/4 ounce per cup (it’s very salty).

Spinach and Mushroom - For the filling, use 6 ounces of cooked, chopped, and squeezed dry spinach, and 3 ounces of finely chopped and sautéed mushrooms. For the egg mixture, replace the sriracha with 1/4 teaspoon garlic salt and replace the cheddar cheese with shredded mozzarella. Garnish with cheese and sliced scallions before baking.

Ham and Broccoli - For the filling, use 6 ounces of finely chopped cooked ham and 3 ounces cooked and chopped broccoli (be sure it’s not too wet). For the egg mixture, replace the sriracha with prepared mustard. Garnish with cheese and sliced scallions before baking.

Sausage and Kale - For the filling, use 6 ounces cooked breakfast sausage and 3 ounces finely chopped kale. For the egg mixture, omit the sriracha and replace the cheddar cheese with shredded pepper jack. Garnish with more pepper jack and sliced scallions before baking.


How to Choose the Right Silicone

Have you ever heard of the pinch test? It’s an easy way to find out if silicone utensils or bakeware are made of 100% pure silicone or a cheaper version which contain plasticizers (aka fillers). Stay away from the cheap versions - they’re not very nonstick and they often give off strong chemical odors/flavors, especially when heated. Pure silicone is extremely nonstick and doesn’t have the same issues with odors/flavors. Manufacturers don’t always tell you if their products are pure silicone so here’s a quick way to tell the difference. Pinch the silicone between your thumb and forefinger - cheap silicone that contains plasticizers will develop a white stress mark where pinched (similar to bending plastic). If you see that white stress mark, move on to another brand.