contact us

Use the form on the right to contact us.

You can edit the text in this area, and change where the contact form on the right submits to, by entering edit mode using the modes on the bottom right.


123 Street Avenue, City Town, 99999

(123) 555-6789

email@address.com


You can set your address, phone number, email and site description in the settings tab.
Link to read me page with more information.

Blog

Butteryum food blog recipes

Filtering by Category: valentines day recipes

Chocolate Raspberry Tarts

Patricia @ ButterYum

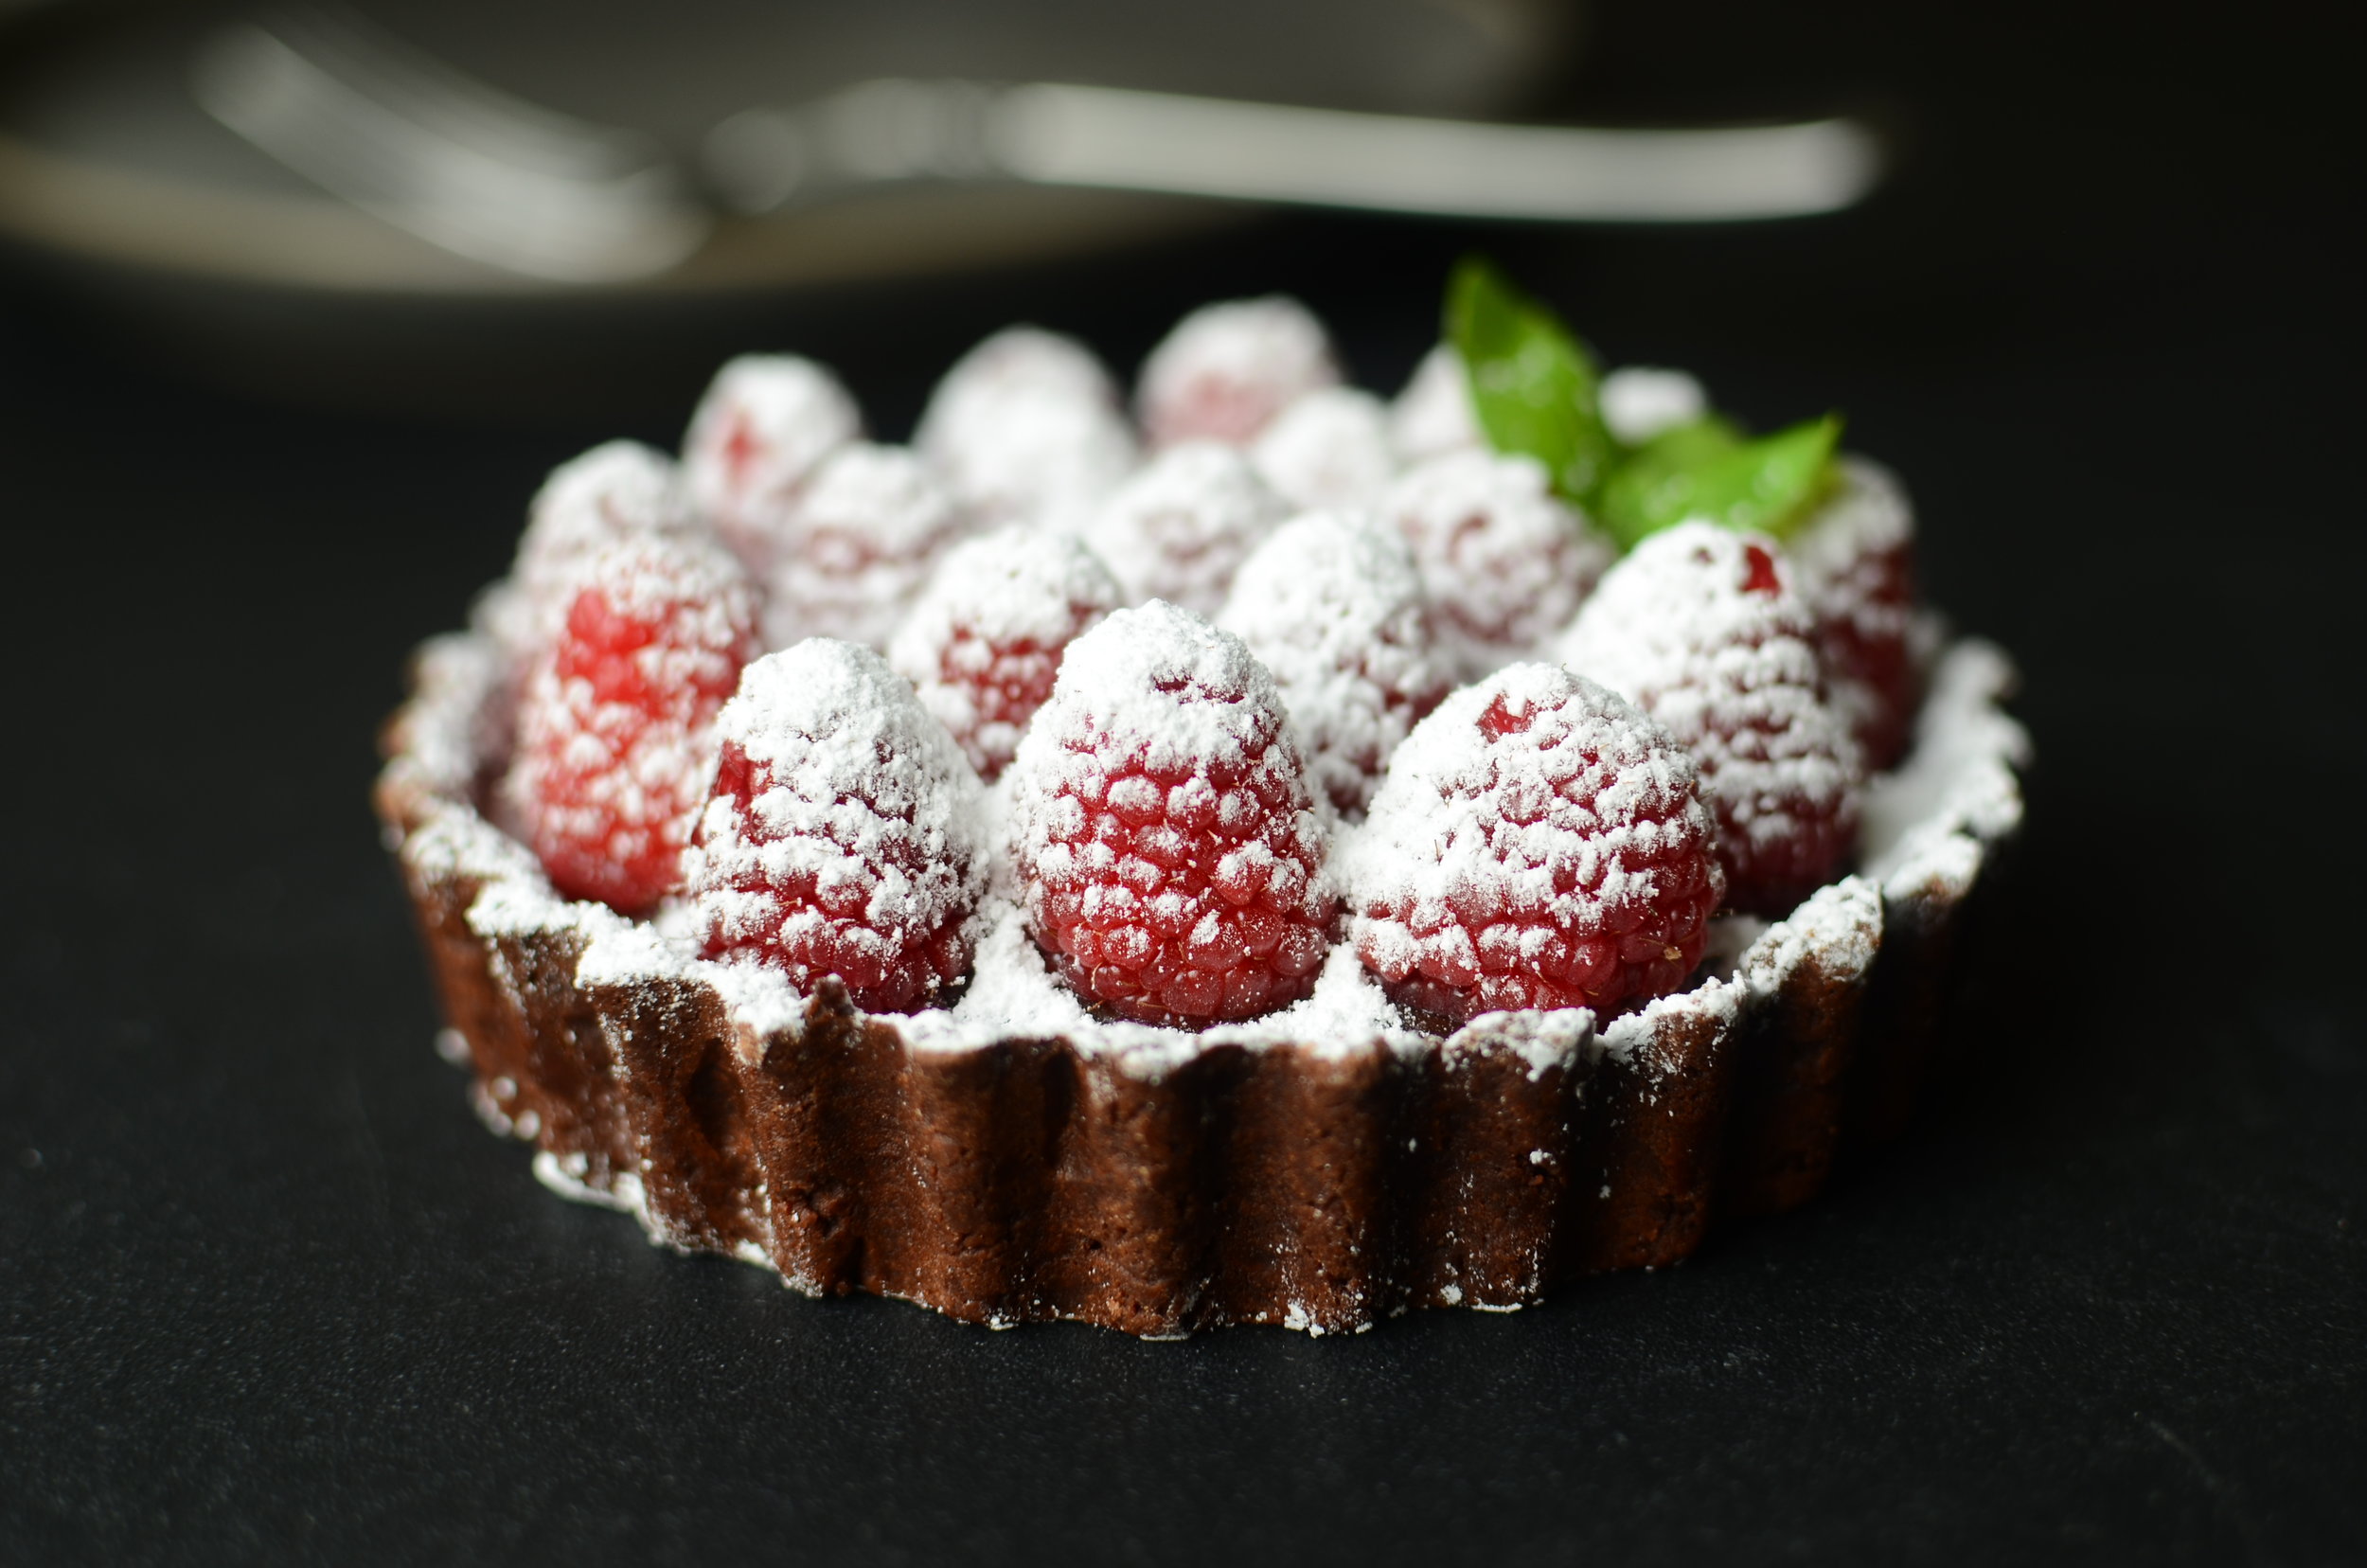
One of my favorite ways to feature fresh, juicy raspberries is to use them to top decadent individually-sized chocolate tarts.  Such an impressive presentation, but so very easy to pull off.  Let me show you how easy they are to make.

chocolate-tart-cookie-crust-butteryum

First, start with a batch of pate sucree (sweet dough) that's been chilling for about 30 minutes.  Press the pate sucree into mini tart pans (these are the ones I have).  I love individually sized desserts, and these are small enough to enjoy all by yourself, but they're not too small to share with someone special.

Now it's time to "bake them blind", which may sound really weird to someone not familiar with the technique, but basically it's partially baking the pie crust.  We do this by lining the tart crust with crumpled parchment paper (crumpling helps it easily fit the contours of the tart), then fill it with a variety of things that will 1) conduct heat, which will allow the crust to bake, and 2) keep the walls of the tart from slumping during the baking process.  

You can purchase metal or ceramic pie weights made specifically for the purpose of blind baking, but there are several substitutions you can use - dried beans, uncooked rice, or even granulated sugar.  Dried beans that have been used for this purpose can no longer be cooked for consumption, but they can be reused again and again so I let them cool completely, then store them in a jar in the pantry for next time.  Rice and sugar will toast slightly, but can be used for other recipes - they'll get slightly toasted in the oven, which imparts a lovely flavor.

lining-tart-shell-with-crumpled-parchment-paper

See how the crumpled parchment is able to hug the contours of the tart?  Much easier than trying to do the same thing with a piece of flat parchment, believe me!

blind-baking-tart-shells-butteryum

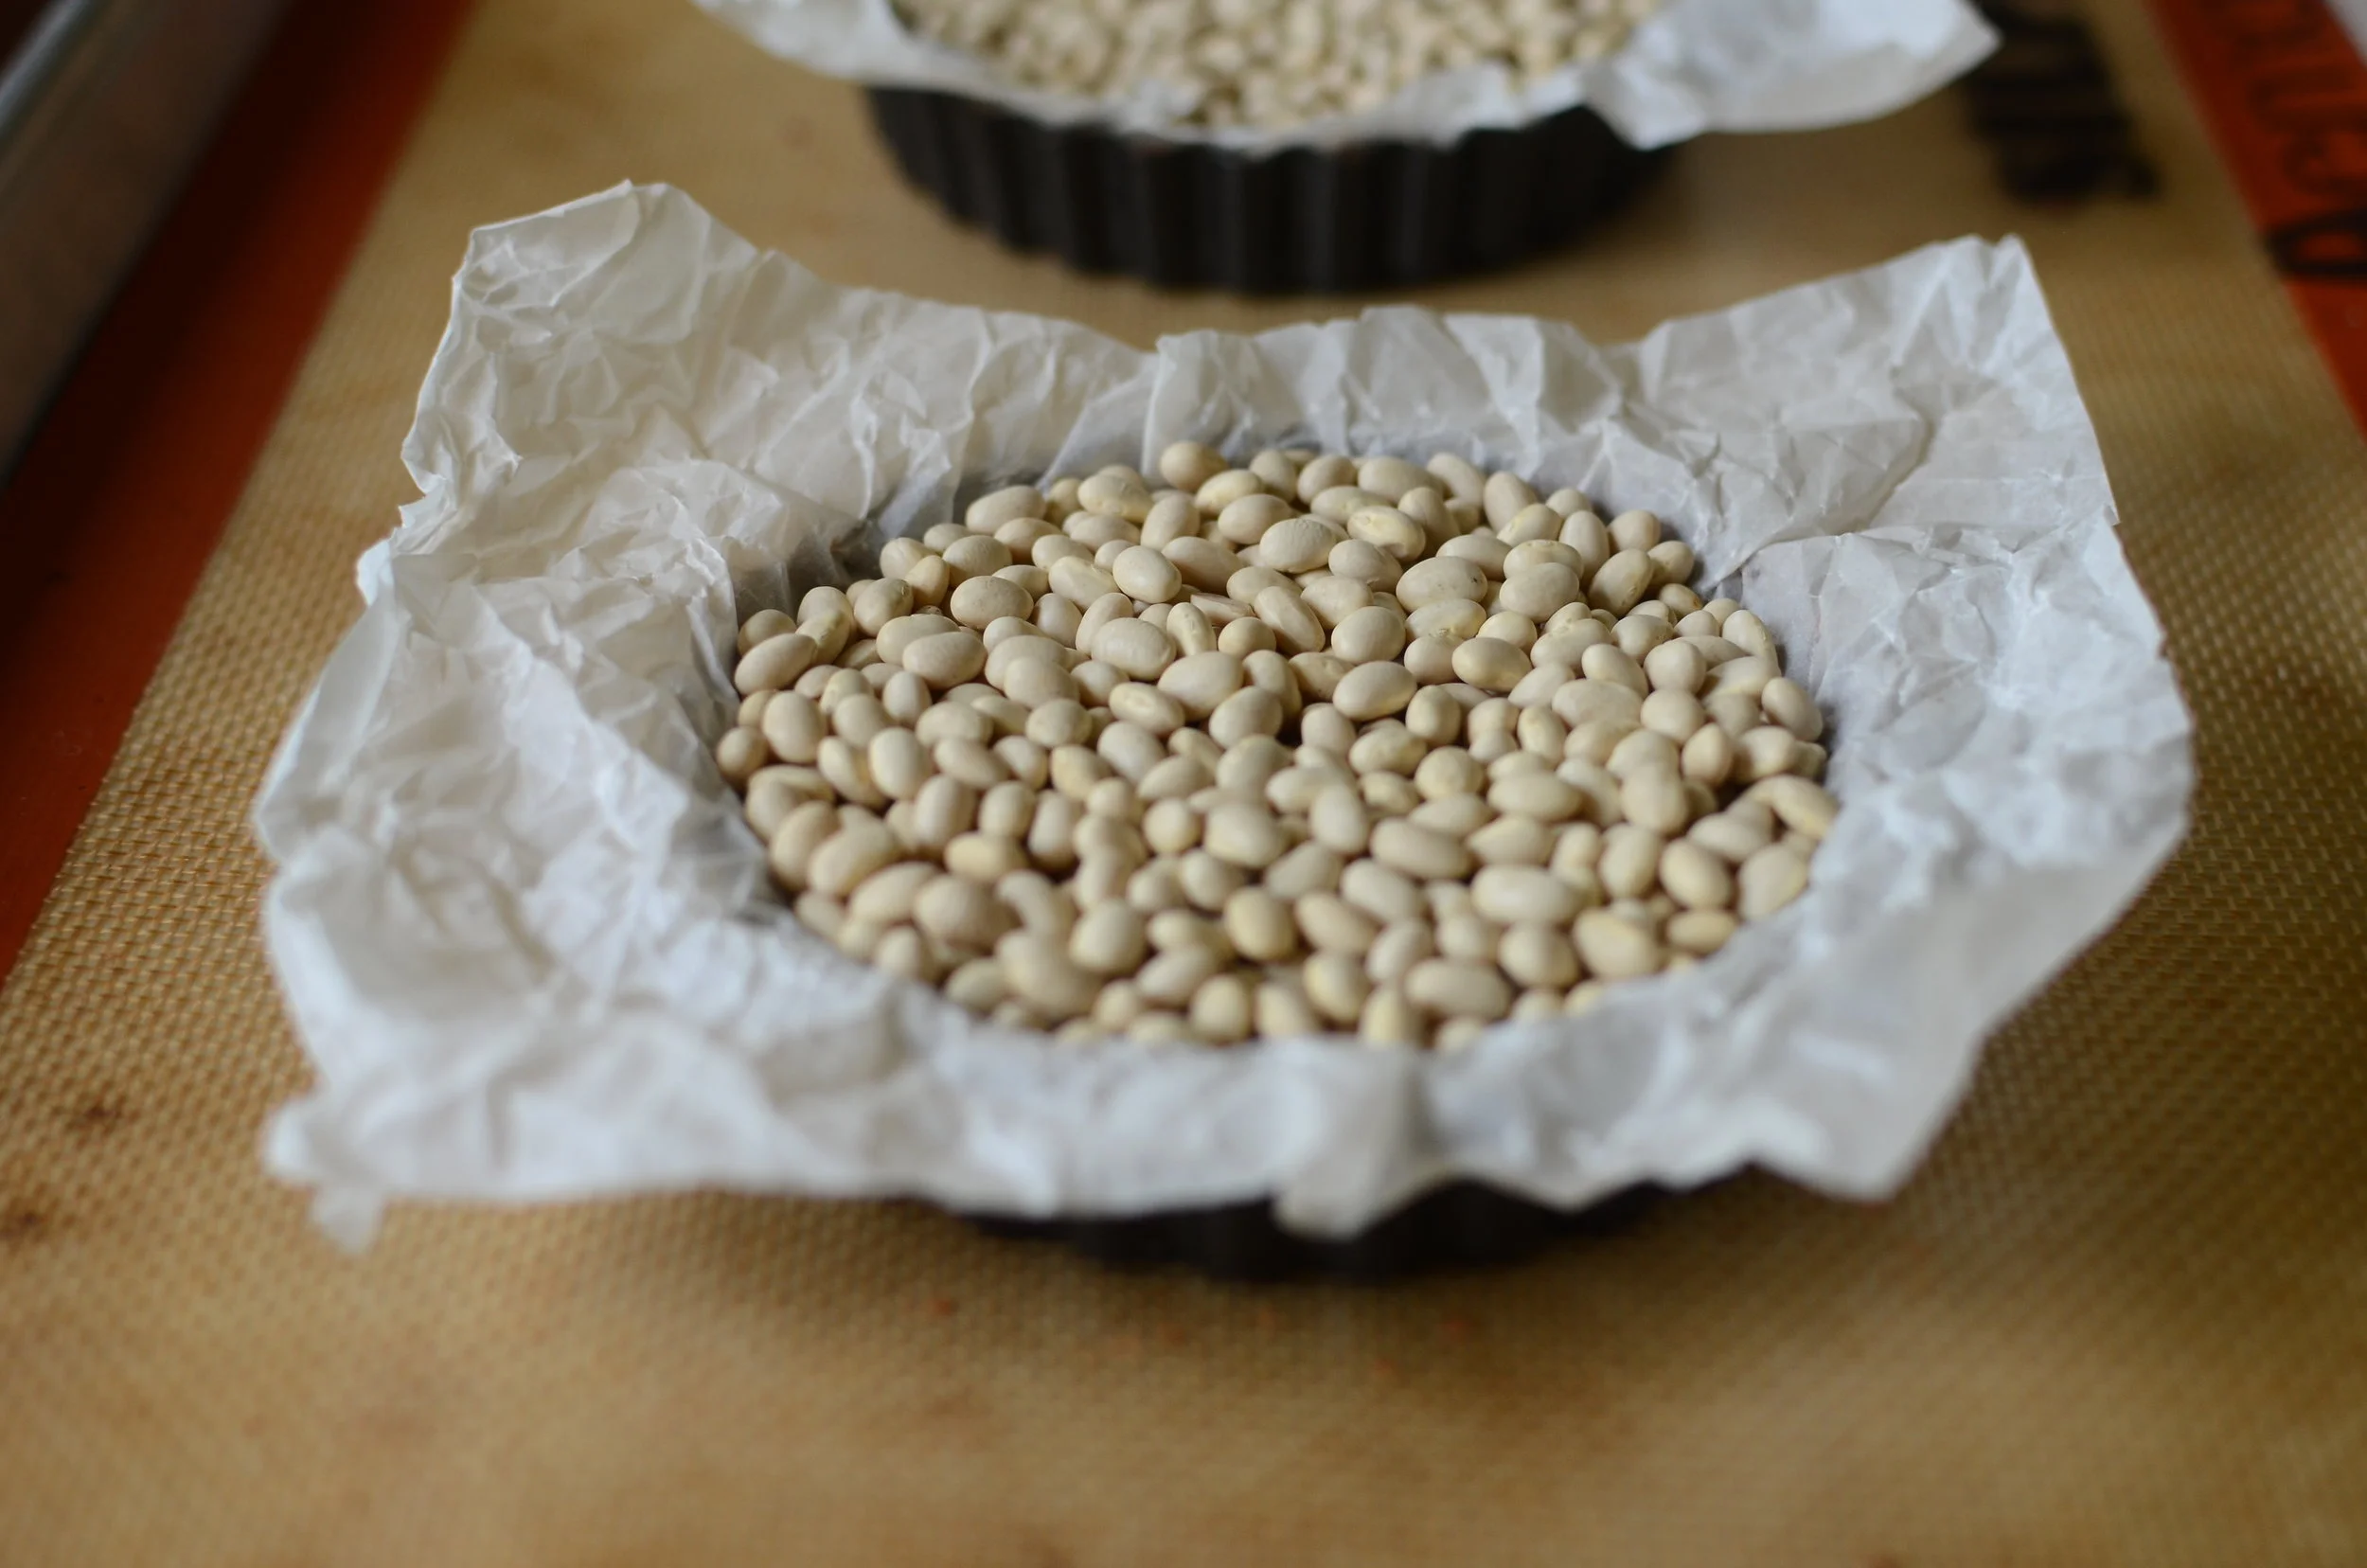
Fill with beans (or rice, sugar, pie weights, etc).  Chill well while the oven preheats.  Chilling the pate sucree before baking helps to keep it from shrinking during the baking process.

blind-baked-chocolate-tart-shell-for-raspberry-tart-butteryum

After 10-15 minutes, the sides of the tart will be set and you can remove the parchment and its contents.  You can see how the sides have lost their shine, but the bottom of the tarts need more time in the oven so return them for another 10 minutes or so.

chocolate-tart-shells-ready-to-fill-butteryum

You'll know they're done when they look dry and are firm to the touch.  Set aside to cool while you make the ganache filling.  

scalding-cream-to-make-chocolate-ganache

To make the ganache, heat cream until just before it begins to boil.

making-chocolate-ganache-butteryum

Pour over your chopped chocolate and let it sit, undisturbed, for a few minutes.  Then whisk together until smooth.

pouring-chocolate-ganache-in-prebaked-chocolate-tart shells

Pour the ganache into the baked tart shells.

ganache-filled-tart-shells-butteryum

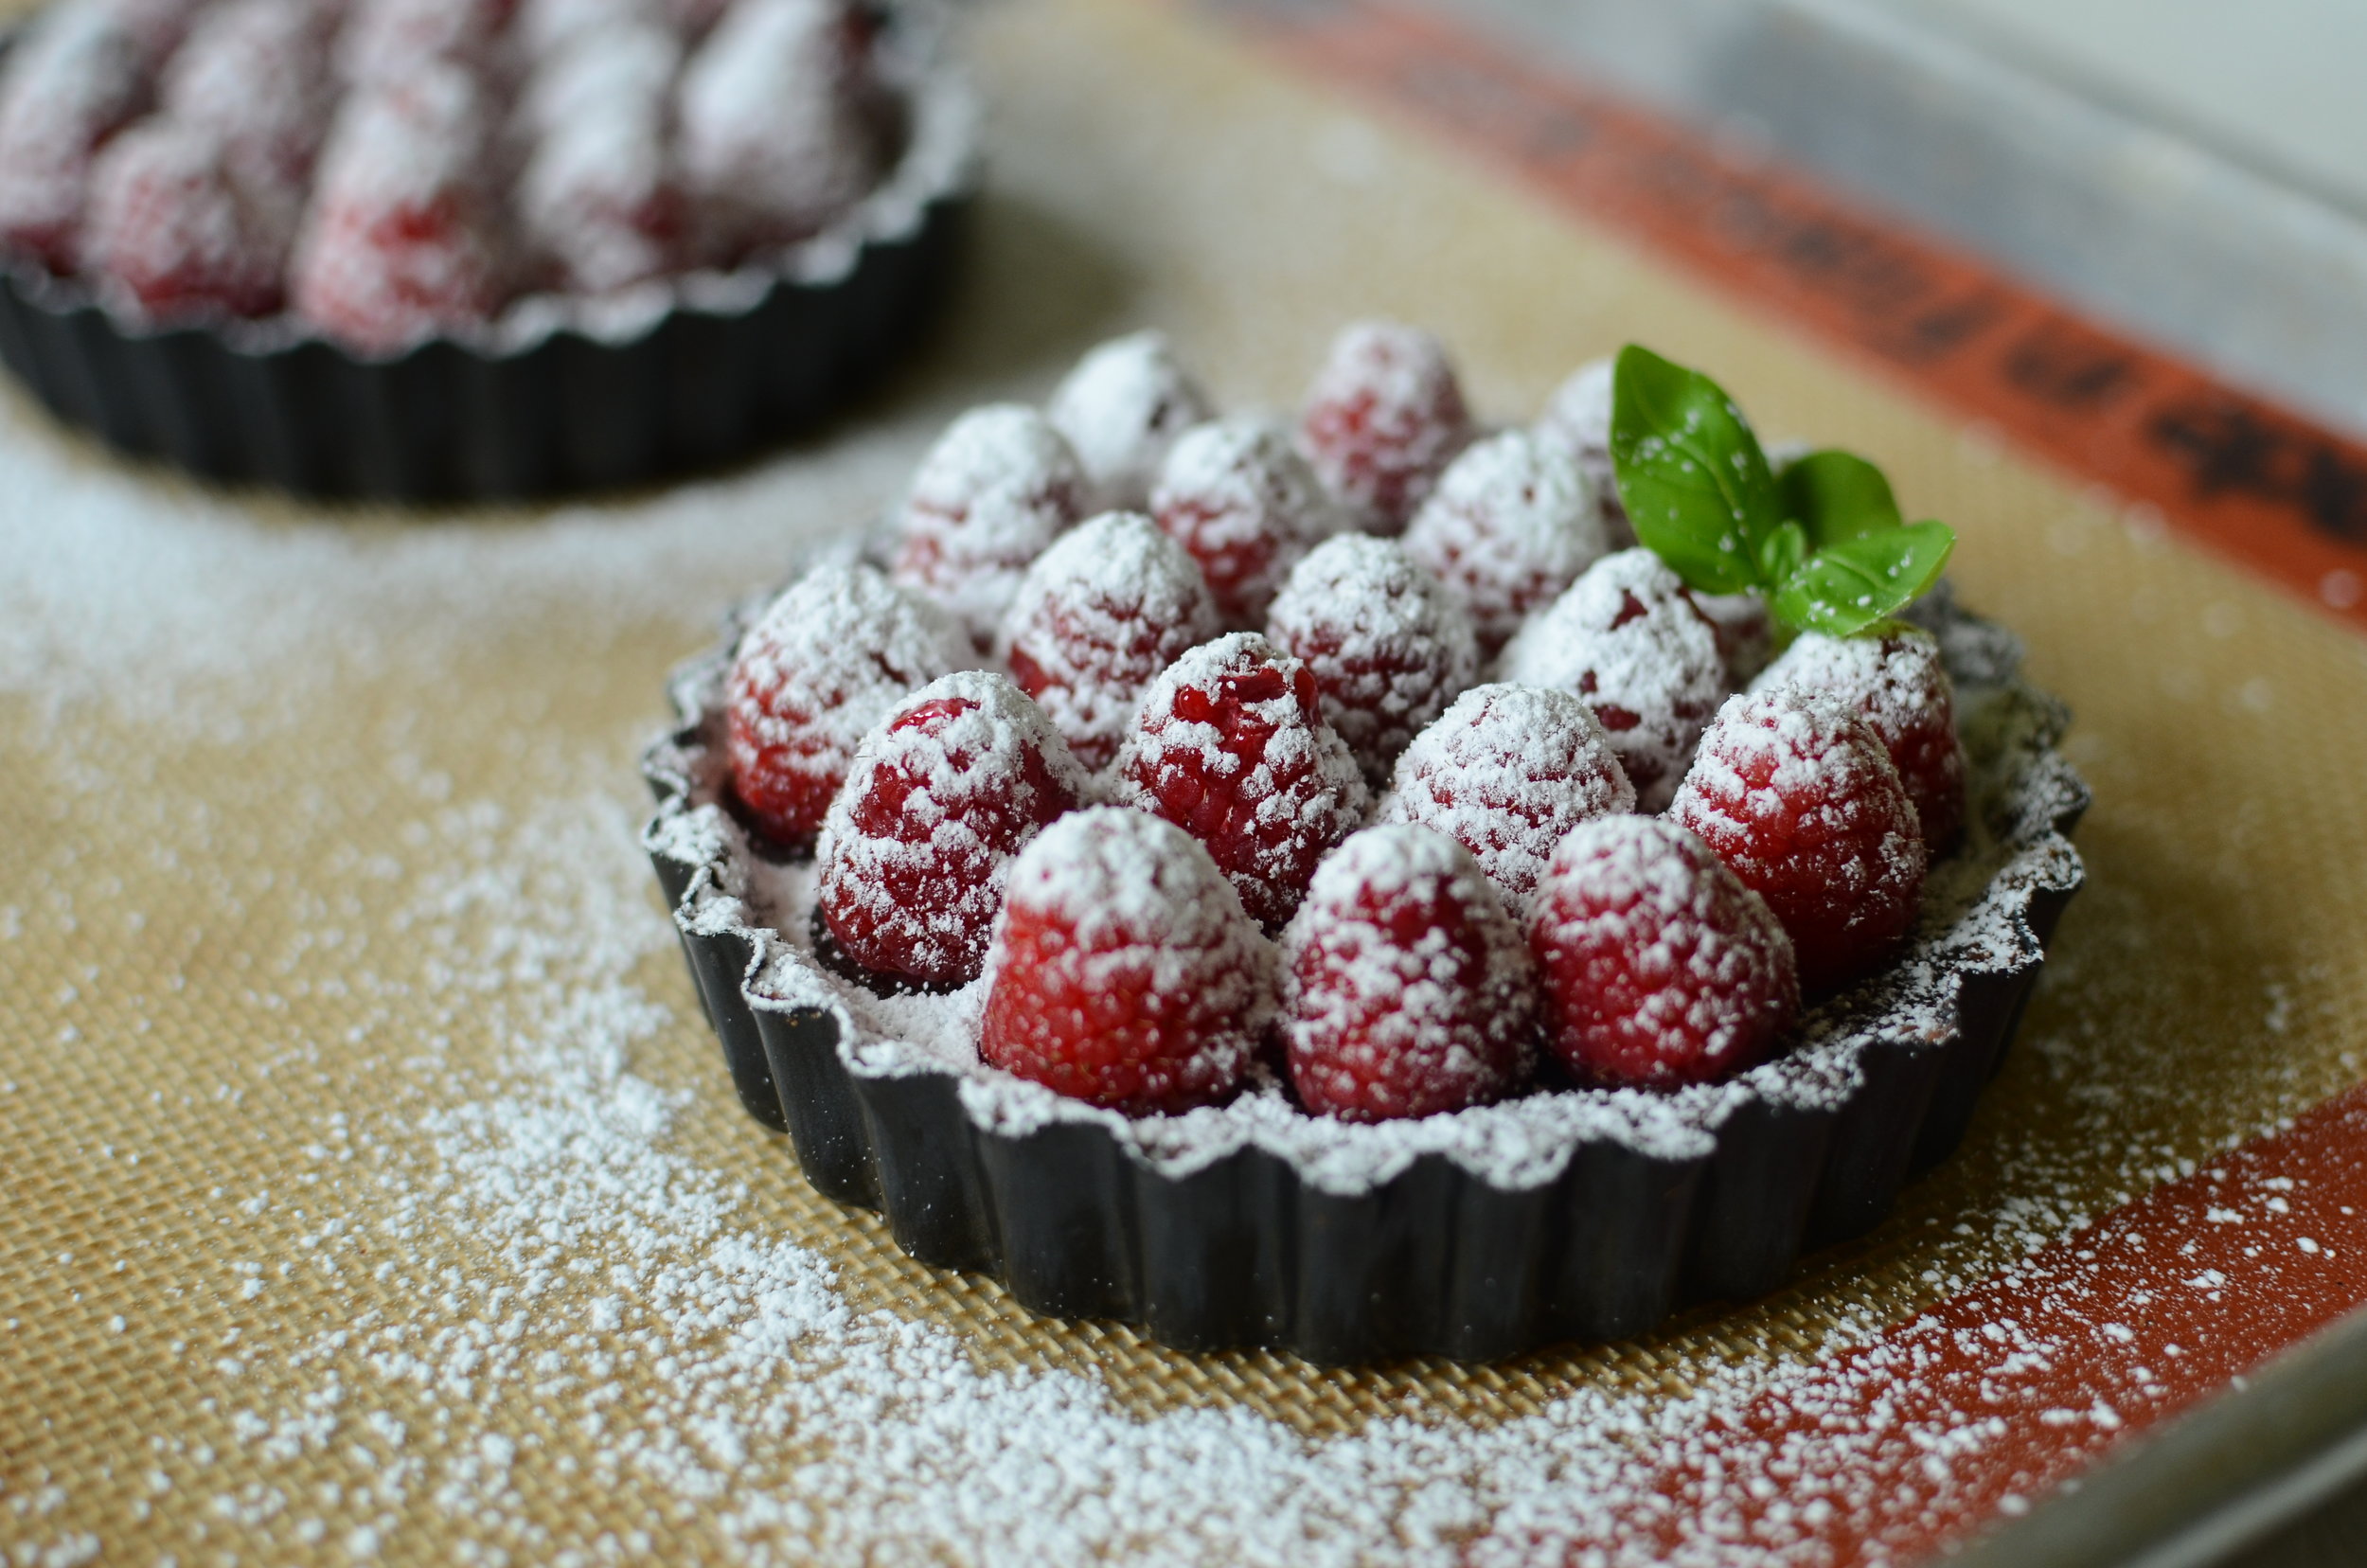
Chill for at least 15 minutes before adding the raspberries so they don't sink into the chocolate. 

mini-chocolate-raspberry-tarts-butteryum

When you're ready to serve, sprinkle the berries with a little confectioner's sugar and remove the sides of the tart pan.

unmolding-chocolate-raspberry-tart-butteryum

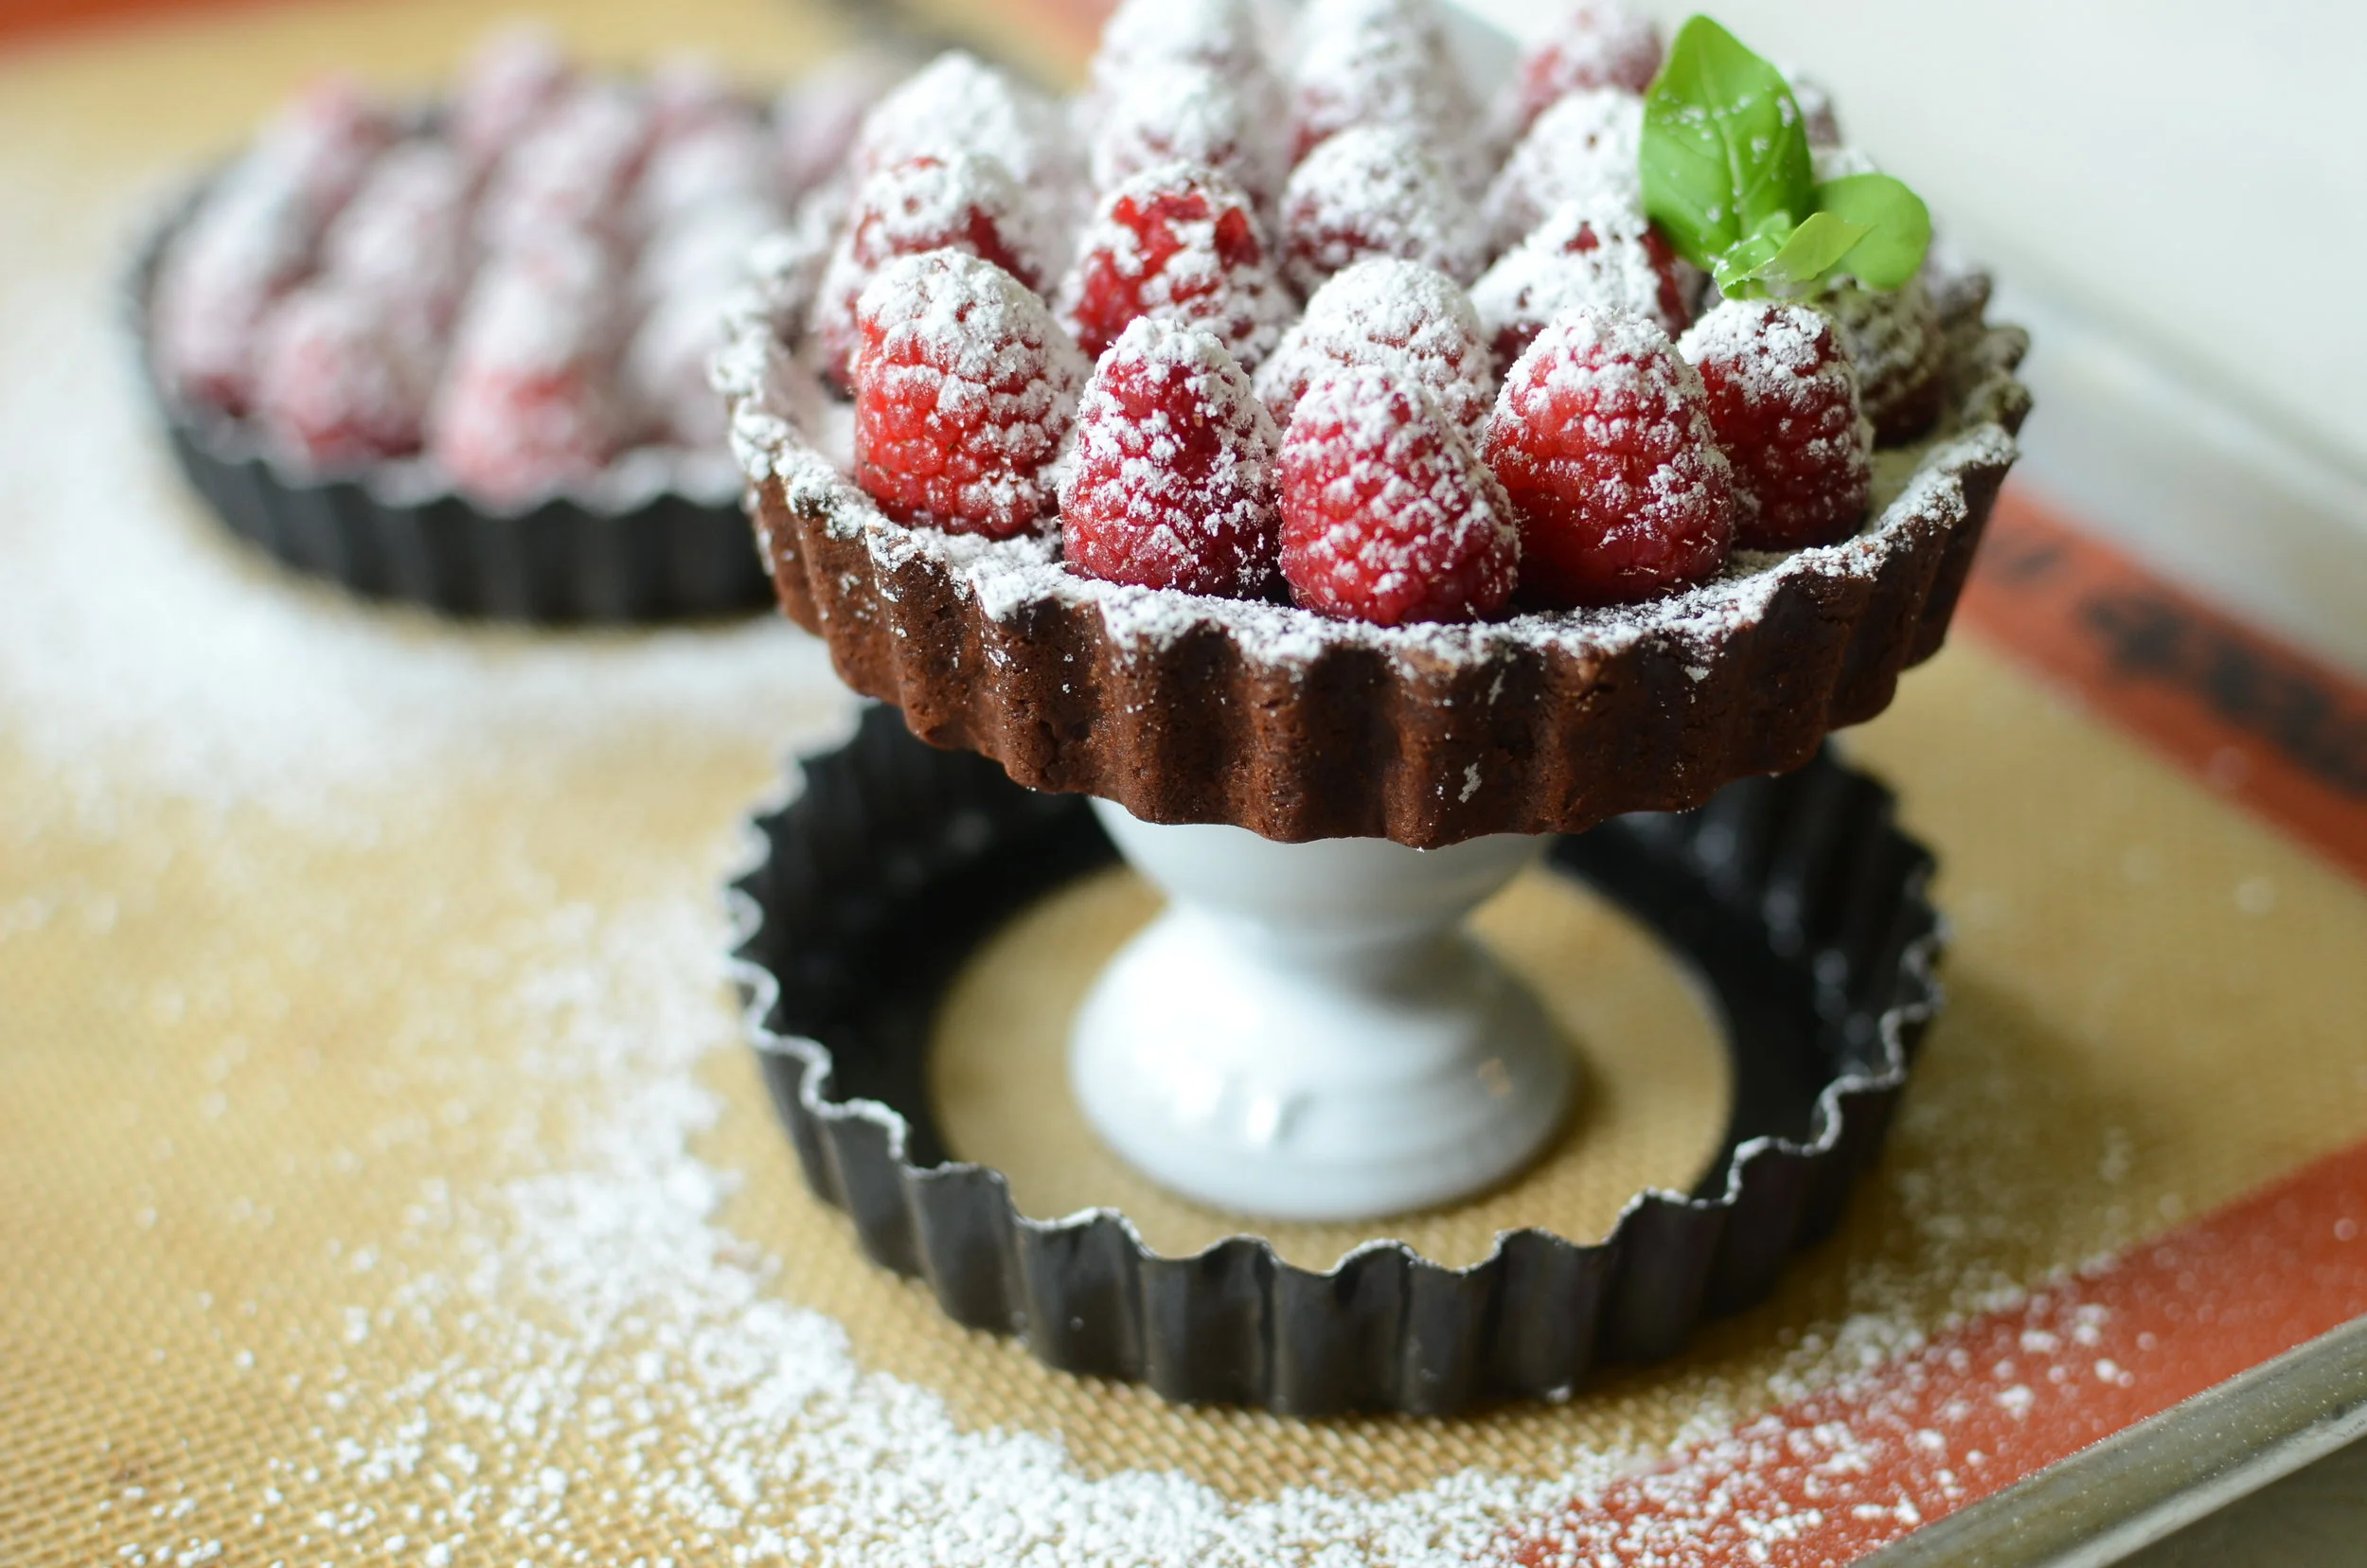
Place the tart on something elevated, yet small enough for the sides of the tart pan to fit over.  Here I'm using an egg cup.  Using gentle pressure, push the sides of the pan down.  

Enjoy!

Items used to make this recipe:

(affiliate links)


Individual Chocolate Raspberry Tarts

makes 6 mini tarts (or one 9-inch tart)

Printable Recipe

Ingredients

Pate Sucree Crust:

Filling:

Garnish:

  • 3 pints fresh raspberries

  • confectioners sugar

  • mint sprigs

Directions

To Make Pate Sucree:

  1. In the bowl of a stand mixer fitted with a BeaterBlade or flat paddle attachment, combine the ingredients until fully combined and no traces of dry ingredients remain.

  2. Wrap will with plastic and chill for 30-60 minutes.

  3. Divide dough equally between 6 individual tart pans with removable bottoms and press evenly across bottom and up sides; chill for at least 15 minutes (or up to several days if wrapped well with plastic).

  4. Preheat oven to 325F and line chilled tart shells with parchment paper filled with beans, rice, sugar, or pie weights.

  5. Place filled tart shells on silpat-lined sheet pan and bake for 10-15 minutes, or until the sides of the tarts are set; remove parchment and return empty shells to oven to continue baking for another 10 minutes or until the bottom crust is set.

  6. Allow tart shells to cool until while you make the filling.

To Make the Filling:

  1. Place chopped chocolate in a heat-safe bowl; set aside.

  2. In a medium heavy-bottom saucepan, heat cream and butter until just before it reaches the boiling point (small bubbles will form around the edges).

  3. Remove cream/butter mixture from the heat and pour over chocolate.

  4. Let the chocolate and cream steep together for 2-3 minutes.

  5. Add the espresso powder and pure vanilla extract; whisk gently until smooth and shiny.

  6. Divide filling between tart shells, leaving 1/4-inch space at the top of each shell; chill for at least 15 minutes before adding berries.

To Serve:

  1. Top with fresh raspberries and sprinkle with confectioners sugar.

  2. Carefully remove sides of tart pan as shown above, and garnish with fresh mint.

Sous Vide Cheesecake in a Jar

Patricia @ ButterYum

I've been having a blast playing with my new sous vide circulator.  This week I have a great cheesecake recipe to share, but instead of being baked in a springform pan, it's cooked in tiny jam jars that are submerged in a hot water bath.  How cool is that?  I've omitted the graham cracker crust that usually lines the bottom of a cheesecake, but you could certainly add a thin layer to the bottom of your jars... or sprinkle crushed graham crackers on top just before serving.  

Eating Keto?  My recipe can easily be made keto-friendly by replacing the sugar with an equal amount of granulated splenda (I do not like the flavor erythritol imparts in this recipe).  The keto stats for one serving are as follows:  4g carbs, 6g protein, 27g fat, 245g sodium, 280g calories.

sous-vide-cheesecake-mise-en-place-butteryum

For the cheesecake batter you'll need cream cheese, eggs, sugar (or splenda), and pure vanilla extract (use the good stuff!).  Make sure the cream cheese and eggs are room temperature so leave them out on the counter for several hours before using.

making-cheesecake-filling-in-food-processor-butteryum

The amount of batter this recipe makes is small so I like to mix it in my small food processor (I love this thing).  Process until completely smooth, scraping the sides of the bowl as necessary.

filling-jars-with-cheesecake-mixture-for-sous-vide-butteryum

Divvy the batter evenly among eight 4-ounce canning jars (these are the ones I used).  If you want to be super precise, you can weigh the amount of batter going into each jar (my favorite scale).  

It's not time to close the jars yet, we still have one more step to do...

sour-cream-topping-for-sous-vide-cheesecakes-butteryum

Now for the best part, the super yummy topping!  To make the topping, whisk together sour cream, sugar (or granulated Splenda), and pure vanilla bean paste.  You can use vanilla extract if you don't have vanilla paste, but trust me, the paste is amazing and you'll love seeing all the vanilla specks when you open those jars (this is the vanilla paste I can't live without).

cheesecake-topping-with-vanilla-bean-paste-butteryum

Can you see all those tiny vanilla bean seeds?  Heaven!  

I guess I didn't get a photo of the topping all whisked together, but it only takes about 20 seconds to do.

sour-cream-topping-jarred-cheesecakes-for-sous-vide

Evenly distribute the topping among the jars.

cooking-cheesecake-via-sous-vide-butteryum

Close the jars "fingertip tight" like you would if you were canning/preserving.  If the lids are too loose, water will get in the jars; and if the lids are too tight, the jars could explode so here's an easy way to know what "fingertip tight" is - place screw band on the jar and turn just until you feel resistance, then turn the band one-quarter turn more. 

Place the jars in a heat-safe container large enough to hold all the jars and a sous vide circulator, and yes it's okay to stack the jars (I used an 8-quart stockpot in the photo above).  Also, place the cooking vessel on a heat-proof surface away from children or pets.  Add water to cover the jars, making sure the water level falls between the minimum and maximum levels indicated on your sous vide circulator.

cooking-cheesecake-sous-vide-butteryum

Bathe the cheesecakes at 165F for 90 minutes.  I've seen a few recipes that call for cooking to 175F, but I think the finished texture is a bit softer and more pleasing if you cook them to 165F.  

sous-vide-jarred-cheesecake-butteryum

After 90 minutes, carefully remove the jars from the hot water.  As the jars cool, you may hear that familiar popping sound as a vacuum forms under each lid - such a satisfying noise!  Once the jar lids have popped (and don't worry if they don't), remove the screw bands and allow them to dry (if you leave the screw bands on the jars, they may rust).  Allow the jars to sit on the counter for about an hour, then chill for at least 3 or 4 hours before serving (or up to 5 days).

sous-vide-jar-key-cheesecakes-butteryum

Serve these little guys directly from the jar.  I use a JarKey to easily release the vacuum sealed lids - if you're gentle, I promise you'll be able to reuse the lids again and again.

I wrote a short post about the JarKey a number of years ago - here's a link if you're interested in seeing it.  

Note: reusing lids is not recommended when canning/preserving for long-term storage, but we're not doing that here so it's fine to reuse the lids. 

blueberry-topped-sous-vide-cheesecakes-keto-butteryum

Aren't they cute?  And they're easy to store (stack them in the fridge), easy to serve (no messy cutting), and easy to transport (tuck one into your lunch bag).  They're great as is, or you can add a little fruit topping - my favorite is blueberry - I make a quick sauce by thawing 1 tablespoon of frozen blueberries in the microwave for 10-20 seconds until soft and mushy, then I allow them to cool and thicken for a minute or two - no sugar or thickeners needed. 

sous-vide-cheesecake-butteryum

Delish!

Items used to make this recipe:

(affiliate links)


Sous Vide Cheesecakes in a Jar

makes 8 servings

Printable Recipe

Ingredients

Cheesecake Layer:

  • 16 ounces cream cheese, room temperature

  • 2 large eggs, room temperature

  • 2/3 cup granulated sugar

  • 1 teaspoon pure vanilla extract

Creamy Topping:

Directions

  1. In the bowl of a food processor, combine cream cheese, eggs, 2/3 cup sugar, and pure vanilla extract until completely smooth, scraping down sides of bowl as needed. Alternatively, you can mix by hand, but be careful not to incoporate as little air as possible.

  2. Evenly distribute cheesecake batter among eight 4-ounce jam jars.

  3. In a small mixing bowl, whisk sour cream, 1/4 sugar, and vanilla bean paste; pour evenly over cheesecake mixture.

  4. Top jars with canning lids, followed by screw bands that are tightened "fingertip tight" (see notes below).

  5. Place jars in a heat-safe container large enough to hold all the jars and a sous vide circulator (it's ok to stack the jars) and place the container on a heat-proof surface away from children or pets.

  6. Add water to cover the jars, making sure the water level falls between the minimum and maximum levels indicated on your sous vide circulator.

  7. Cook the cheesecakes for 90 minutes at 165F, then remove from water and cool for 1 hour (remove screw bands to prevent the lids from rusting).

  8. Chill cheesecakes for at 3 or 4 hours before serving (or up to 5 days).

Notes

  • Recipe can be made Keto-friendly by replacing sugar with an equal amount of granulated splenda (may also substitute erythritol following manufacturer's suggested equivalent).

  • To tighten jars "fingertip tight" - place screw band on jar and turn just until you feel resistance, then turn band one-quarter turn more.