Adorable Halloween Ghost Cookies
Patricia @ ButterYum
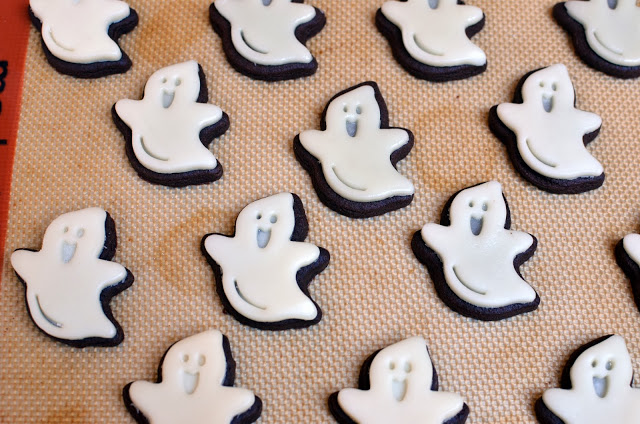
Aren't these adorable? I'm totally dying here - love them! And you're not going to believe how incredibly easy they are to make. All you need are a few essentials: my yummy chocolate sugar cookie recipe, a rolling pin, a ghost plunge cutter, and white fondant. There are a few additional items that aren't necessary, but come in handy if you happen to have them - no biggie if you don't. Okay, let me show you how they're made.

Start by making my yummy chocolate almond espresso cookie dough - you can find the recipe at the end of this post.
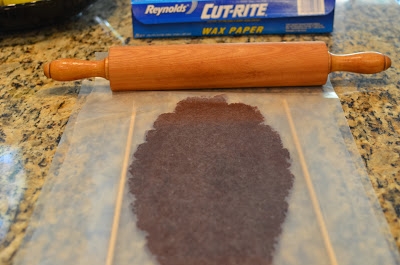
Roll the cookie dough between two pieces of wax paper using 1/4-inch dowels as a guide so each cookie ends up being the exact same thickness. Or try rolling guides.

Remove the top layer of wax paper and use a lightly floured plunger cutter to cut your shapes. No need to push down the plunger to leave details on the cookie dough - that part comes later. Wax paper is the unsung hero of this technique. I go through miles of the stuff when I make a ton of cookies.
IMPORTANT: Slide the wax paper with the cookie cutouts onto a half sheet pan and refrigerate for at least 5 minutes so the dough will be firm enough to handle without distorting when transferring them to a sheet pan for baking.

When the cookie dough is chilled firm, remove the cutouts from the wax paper and place them on a silpat lined half sheet pan. Bake in a 350F oven for 10 minutes.
See how chilling the dough helps the cutouts keep their shape? No wonky heads or broken arms - every ghost looks the same. Another great thing about rolling between layers of wax paper, you're not adding lots of excess flour so you can reroll the scraps as many times as you like without any trouble.

While the cookies are baking, prepare some white fondant by kneading it in your hands until it's soft and pliable. I prefer Fondarific and Satin Ice.
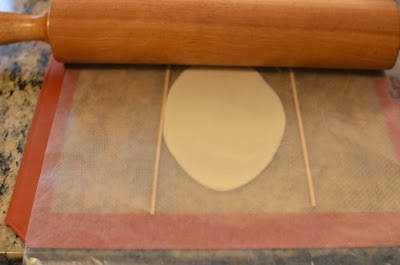
Okay, roll the fondant like we rolled the cookie dough, only this time, instead of using a 1/4-inch dowel, we'll use bamboo skewers because we want a thinner layer of fondant. Skewers are about 1/8-inch thick.
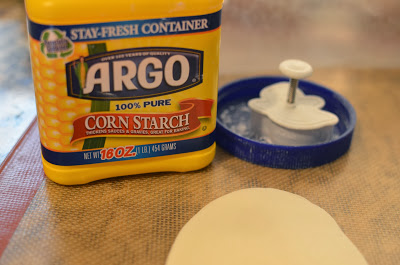
Using the same plunge cutter, dip it lightly in cornstarch and tap off the excess.

Cut the ghosts out of the fondant, and this time, go ahead and push the little plunger thingy down to leave an impression of the details.
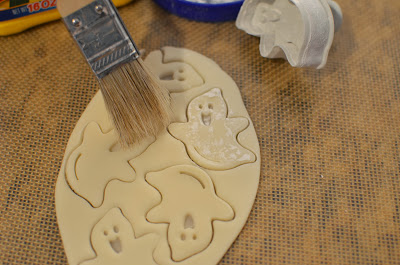
Use a pastry brush to remove any residual cornstarch. Now pop the fondant ghosts into the fridge for a minute or two so they can firm up - again, so they won't distort when you transfer them to the cookies.

Remove the cookies from the oven and allow them to cool for about 5 minutes, then place a chilled fondant ghosts right on top. The warmth of the cookie will gently melt the bottom of the fondant cutout and the two will magically bond together.

See? It's stuck like glue!

Now, if you have perfectionistic tendencies, you'll want to use a toothpick to clean up any stray bits around the edges of the fondant. Totally not necessary, but I must. What can I say.

Ta-da! I hope you enjoyed this fun tutorial. Now go make some cute cookies!


Items used to make this recipe:
(affiliate links)
rolling guides https://amzn.to/3ACKQaI
plunge cutters https://amzn.to/3IFIaMC
fondant https://amzn.to/3o2md2k
pastry brush https://amzn.to/3ckcxbp
dutch-processed cocoa powder https://amzn.to/3KNLdEb
pure vanilla extract https://amzn.to/3AEmKg6
instant espresso powder https://amzn.to/3G73Orj
Chocolate Almond Espresso Cookie Cutouts
makes a lot of cookies!!
Ingredients
16 tablespoons unsalted butter, room temperature
1 cup granulated sugar
1 large egg
1 teaspoon pure vanilla extract
1 teaspoon pure almond extract
1 teaspoon instant espresso powder
2 1/3 cups all purpose flour
1 1/2 teaspoon baking powder
1/4 teaspoon fine salt
2/3 cup dutch-processed cocoa powder, sifted
Directions
Preheat oven to 350F.
In the bowl of a stand mixer fitted with the paddle attachment, cream together the butter and sugar.
In a small bowl, combine the eggs, vanilla extract, almond extract, and espresso powder; add to the butter/sugar mixture until combined.
In a medium bowl, whisk together the flour, baking powder, salt, and cocoa; slowly add it to the butter mixture until all the ingredients are well combined.
Roll dough to a thickness of 1/4-inch between two layers of parchment.
Cut out desired shapes with a lightly floured cutter and chill until firm before transferring to a silicone lined sheet pan.
Bake for about 10 minutes.
Cool for 5 minutes before transferring cookies to a cooling rack.
Top with fondant cutouts, if desired, while cookies are still warm.
Store in an airtight container for up to a week.


PS - this cookie dough works with plunge cutters even if you don't want to top the cookies with fondant - not as cute though ;).