contact us

Use the form on the right to contact us.

You can edit the text in this area, and change where the contact form on the right submits to, by entering edit mode using the modes on the bottom right.


123 Street Avenue, City Town, 99999

(123) 555-6789

email@address.com


You can set your address, phone number, email and site description in the settings tab.
Link to read me page with more information.

Blog

Butteryum food blog recipes

Filtering by Category: snack recipes

Mini Crumb-Topped Sour Cream Banana Breads

Patricia @ ButterYum

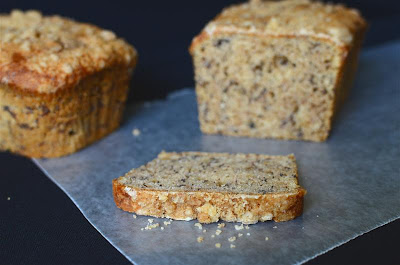
This is a wonderful recipe that makes 10 mini loaves of cinnamon-laced, crumb-topped sour cream banana bread.  I love being able to pull one out of the freezer for a quick snack or gift.  I like to bake these in disposable foil pans so I don't have worry about my pans being returned.

Items used to make this recipe:


Mini Crumb-Topped Sour Cream Banana Breads

makes 10 mini loaves (approx 5 1/2 x 3 1/4-inch)

Printable Recipe

Ingredients

Banana Bread:

  • 12 tablespoons unsalted butter, softened

  • 3 cups white granulated sugar

  • 3 large eggs

  • 6 ripe bananas, mashed

  • 16 ounces sour cream

  • 2 teaspoons vanilla extract

  • 2 teaspoons ground cinnamon

  • 1/2 teaspoon fine salt

  • 1 tablespoon baking soda

  • 4 1/2 cups all-purpose flour

Topping:

  • 3 tablespoons unsalted butter, melted

  • 1 teaspoon cinnamon

  • 1/2 cup all-purpose flour

  • 1/2 cup brown sugar (light or dark)

  • pinch of salt

Directions

  1. Preheat oven to 300F and place rack in center.

  2. Spray loaf pans with baking spray.

  3. Make the crumb topping in a small bowl by combining the melted butter and cinnamon, then stir in the flour, brown sugar, and salt; stirring until clumps form. Set aside.

  4. In a large bowl, cream butter and sugar; add eggs, bananas, sour cream, vanilla, and cinnamon.

  5. In a separate bowl, whisk together the flour, baking soda, and salt.

  6. Stir the banana mixture and flour mixture together, just until combined.

  7. Pour 1 cup of batter into each prepared mini loaf pan and sprinkle each with an equal amount of crumb topping.

  8. Bake on center rack for 35-45 minutes, or until a toothpick inserting in the center comes out clean.

  9. Loaves can be removed from the pan after cooling for 20 minutes. Cool completely before serving.

Chocolate Mocha Snack Cake (and a cake tip)

Patricia @ ButterYum

Have you had the pleasure of tasting Biscoff Spread yet?  I've been hoping our local grocery stores would start carrying it for more than 2 years now and I finally stumbled upon it a few weeks ago.  I quickly grabbed some and headed home to see if all the fuss I'd read about was true.  I'm happy to report, IT WAS!!!  If you're familiar with Biscoff Cookies, you already know that amazing butter-cinnamon-caramel flavor.  Now imagine it as a soft, creamy spread.  Insanely good, I tell you.  Insane!   I made the mistake of letting one of the teens taste my glorious find, but then I noticed the contents of the jar disappearing at an alarming rate so I had to move it into protective custody. 

Anyway, Biscoff Spread is soft, sweet, and spreadable, making it a perfect no-fuss substitute for frosting on my mocha version of this super simple chocolate mocha snack cake - a one-bowl recipe that bakes in about 35 minutes. 

There’s a reason why this cake is a family favorite! Don’t forget to check out the bottom of this post to see how I bake my cakes without a big hump in the middle.

Items used to make this recipe:

(affiliate links)


Chocolate Mocha Snack Cake w/Biscoff Frosting

Printable Recipe

serves 9-12

Ingredients

Cake:

  • 1 1/2 cups all-purpose flour

  • 1 cup granulated sugar

  • 3 tablespoons Dutch-processed cocoa powder

  • 1 teaspoon baking soda

  • 1 teaspoon table salt

  • 6 tablespoons vegetable oil

  • 1 teaspoon pure vanilla extract

  • 1 tablespoon white vinegar

  • 1 cup freshly brewed coffee (or hot water)

Frosting:

Directions

  1. Preheat oven to 350F.

  2. Prepare an 8x8-inch square cake pan with Baker's Joy baking spray.

  3. If you want your cake to bake without an ugly hump in the middle, wrap the pan with a moistened insulated baking strips (see photos below).

  4. In a medium bowl, combine all the cake ingredients and mix just until incorporated.

  5. Pour the batter into a prepared pan and bake in preheated oven for 35-40 minutes, or until a toothpick inserted in the center comes out clean.

  6. Remove cake from oven and place on a rack to cool completely; about 2 hours.

  7. To decorate the cake, use an offset spatula to spread the Biscoff in a thin, even layer on top of the cake.

  8. Garnish with chocolate covered coffee beans.

Notes

  • This cake is great served at room temperature, but it's also excellent chilled (that's the way I like to enjoy it).

  • Cake batter can also be used to make 24 cupcakes.

adapted from Lucinda Scala Quinn


Now for my tip:

See this cake?  It was baked in a naked cake pan.  Kind of sad looking, don't you think?  The edges of the cake are over baked and dry, and the center of the cake puffed into a huge hump.

Why does this happen?  Because a naked cake pans heat very quickly in the oven, causing the batter along the edges to bake and set long before the batter in the center of the pan.

To avoid the hump issue, simply wrap the pan with a moistened insulated baking strip before popping it in the oven.

So why do the insulted baking strips make such a difference?  They keep the cake pan temperature in check which allows all of the batter to bake at the same rate, resulting in a even layer.

See?  This is exactly the same cake recipe, but look how nice and even it baked.  The sides are as high as the middle.  No Hump!

And here's what that beautifully even cake looks like when plated.  Professional, no?  Needless to say, I highly recommend using insulated baking strips.  Happy Baking!

Recent Posts