contact us

Use the form on the right to contact us.

You can edit the text in this area, and change where the contact form on the right submits to, by entering edit mode using the modes on the bottom right.


123 Street Avenue, City Town, 99999

(123) 555-6789

email@address.com


You can set your address, phone number, email and site description in the settings tab.
Link to read me page with more information.

Blog

Butteryum food blog recipes

Filtering by Category: snack recipes

Arborio Rice Pudding

Patricia @ ButterYum

Who needs a little comfort?  How about some creamy rice pudding?  How do you like yours, hot or cold?  With raisins or without?  Me, I like it cold without the raisins, but if you like it hot, so be it... you like raisins, no problem.  This recipe is easily adapted to suit your taste.  There are, however, a few things to keep in mind when making it.  Milk, rice, and sugar all burn easily, so be sure to use a good quality heavy-bottomed sauce pan, tri-ply stainless, enameled cast iron… something along those lines.  The next thing is to keep an eye on the mixture while it's cooking - stay in or near the kitchen and you should be good. Also, stir frequently to keep the mixture from boiling over.

(arborio rice, left; long grain rice, right)

Lastly, I like to use Arborio rice.  You can use long grain rice if that's all you have, but Arborio is the same rice used to make risotto, and we all know how creamy risotto is, right?  That's because Arborio has a higher starch content than long grain rice, so naturally it makes a creamier rice pudding. 

Items used to make this recipe:

(affiliate links)


Arborio Rice Pudding

makes four 1-cup servings

Printable Recipe

Ingredients

  • 1/2 cup uncooked Arborio rice

  • 4 cups milk

  • 1/4 cup granulated sugar

  • 1 tablespoon butter

  • 1/4 cup raisins (optional)

  • 1/2 to 1 teaspoon vanilla bean paste or pure vanilla extract

  • 1 egg yolk (optional - over the years, I’ve decided it’s unnecessary)

  • Sprinkling of cinnamon (optional)

Directions

  1. In a medium heavy-bottomed sauce pan, place rice, milk, sugar, and butter; stir.

  2. Bring to a boil; stirring occasionally, being careful to not allow the mixture to boil over.

  3. If using raisins, add them now; reduce heat to a gentle bubble and stir frequently for about 15-20 minutes until the rice is plump and creamy (see note below) - don't walk away during this step.

  4. Remove from heat and stir in vanilla and optional optional egg yolk.

  5. Serve immediately or transfer to a storage container and cover; chill completely.

  6. To speed the chilling process along, pour onto a large rimmed cookie sheet before covering with plastic wrap and placing it in the fridge.

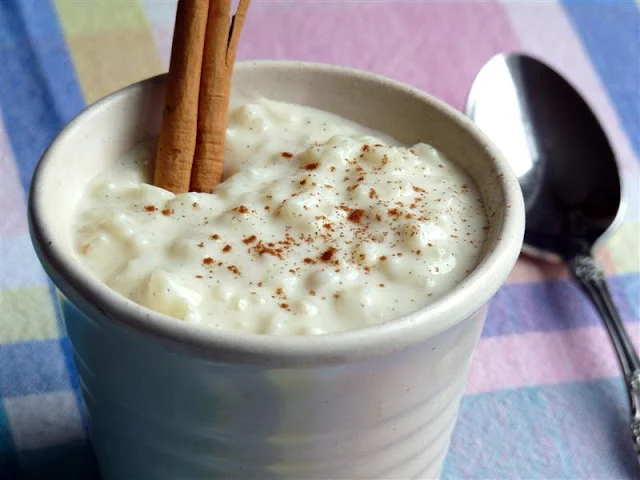
  7. Optional: sprinkle with a little cinnamon before serving.

Notes

  • If you plan to serve the rice pudding hot, cook to desired serving consistency.

  • If you plan to serve it cold, it will firm up when chilled so stop cooking when the consistency is a bit looser than you want.

  • If you find your chilled rice pudding is too firm, stir in a little cream or half and half.

As Requested - My Favorite Chocolate Chip Cookies

Patricia @ ButterYum

I recently reviewed the "Best Chocolate Chip Cookies" by Cook's Illustrated.  Although CI's cookies were indeed very good, I mentioned they weren't as good as my favorite recipe.  Little did I know how many comments and email requests I would get by saying that.

So here is the recipe that I love so much - it comes from CookWise by Shirley O. Corriher.  In the book, Shirley shares 4 chocolate chip cookie variations; basic, thin, puffed, and lastly, in-between.  The "puffed" and "in-between" versions rely on the use of butter-flavored shortening instead of real butter like the "basic" and "thin" versions.  Since my blog is called ButterYum, you can guess which variations I wanted to try - the basic and the thin ones.  Both were extremely good, but the thin cookies won my family's taste test by a landslide.

Because butter melts more easily than shortening, these cookies spread a bit during baking - they bake up crisp around the edges and chewy in the middle.  They aren't the most attractive chocolate chip cookies you'll ever see, but I promise they won't disappoint when it comes to flavor - I can't resist their strong vanilla, hint of caramel, chocolaty-chip goodness.  I hope you like them as much as we do.  On a side note - this recipe contains no eggs, so enjoy eating the dough raw without guilt.

Items used to make this recipe:

(*affiliate links)


Shirley O. Corriher's Thin Chocolate Chip Cookies

makes 36 cookies (#50 cookie scoop)

Printable Recipe

Ingredients

  • 1 1/2 cups bleached all-purpose flour (yes bleached - using unbleached flour will result in "greasy" cookies)

  • 3/4 teaspoon fine salt

  • 3/4 teaspoon baking soda

  • 10 tablespoons unsalted butter, softened

  • 1/2 cup granulated sugar

  • 1/3 cup light brown sugar

  • 3 tablespoons light corn syrup (*see my note below)

  • 2 tablespoons milk

  • 1 tablespoon pure vanilla extract

  • 1 cup mini chocolate chips (6 ounces) - regular choc. chips are too large for these cookies

Directions

  1. Preheat oven to 375F.

  2. In a medium bowl, sift together the flour, baking soda, and salt; set aside.

  3. In the bowl of a stand mixer, cream the butter, granulated sugar, and light brown sugar together until light and fluffy.

  4. Add corn syrup and milk; beat well and scrape down the sides of the bowl.

  5. Add vanilla extract; beat well.

  6. On low speed, gradually add the reserved dry ingredients and mix on low until combined.

  7. Add mini chips and mix on low for 5 seconds.

  8. Remove bowl from mixer and check to see all the ingredients are combined well - use a silicone spatula to finish mixing if needed.

  9. Prepare half half sheet pans by spraying with non-stick baking spray (or line with Silpat liners).

  10. Drop a #50 scoop (1 tablespoon) of batter about 2 inches apart onto completely cool sheet pan (don't be afraid to chill the cookie dough if it starts to get too soft at room temperature).

  11. Bake one sheet pan at a time; for 8-12 minutes or until edges just begin to turn brown (check early).

  12. Remove sheet pan from oven and wait 3 minutes before transferring cookies to a rack to cool completely.

Note

  • My adaptation of this recipe uses an equal amount of Lyle’s Golden Syrup in place of the light corn syrup. The flavor of Golden Syrup is buttery and caramel-y (is that a word???). I made both versions recently and the Lyle’s Golden Syrup version was preferred by all.

adapted from CookWise by Shirley O. Corriher