contact us

Use the form on the right to contact us.

You can edit the text in this area, and change where the contact form on the right submits to, by entering edit mode using the modes on the bottom right.


123 Street Avenue, City Town, 99999

(123) 555-6789

email@address.com


You can set your address, phone number, email and site description in the settings tab.
Link to read me page with more information.

Blog

Butteryum food blog recipes

Filtering by Category: christmas recipes

Penguin Snack Cakes

Patricia @ ButterYum

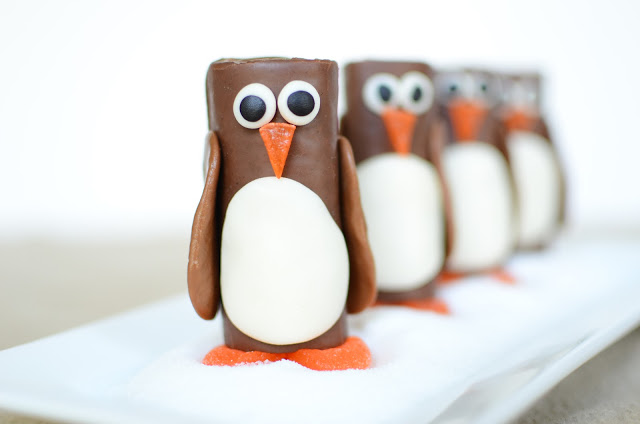
Are these guys cute or what?  That's what I though when I saw them on Pinterest not long ago.  I've always had a fondness for penguins, and so has my oldest son, so I knew I wanted to make them for a recent family get-together.

You’ll need Swiss cake rolls, tootsie rolls, sugared orange slices, white fondant, and black fondant. Better get a little extra of everything - you know, for snacking.

Cut the sugared orange slices in thirds.

Remove the center section and set it aside for now. Press the two outer sections together (reserve the center section for later).

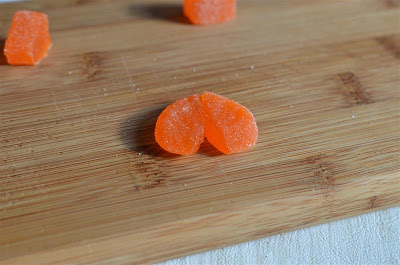
Squish the two outer sections down to flatten them (they’ll stick together nicely). Set aside.

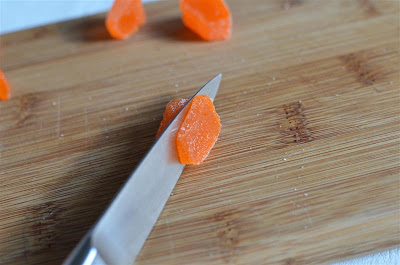
Now take the reserved center piece and cut a small beak shape; set aside.  This is where the operation gets a little sticky - keep a moist towel and a dry towel handy.  

When you have the appropriate number of beaks and feet, set them aside and move to the next step.

It’s fondant time. You’ll need a 1-inch diameter ball of white fondant for the tummy. For the eyes, you’ll need two 1/4-inch balls of white fondant and two 1/8-inch balls fo black fondant. Be sure to clean your hands well after handling the black fondant so you don’t accidentally discolor the white fondant when you handle it.

Place one of the 1-inch balls of white fondant in the center of your palm.

Flatten the ball into an oval shape.

Place the Swiss cake roll, flat side down on your work surface and place the flattened oval as shown.

Now it’s time to make the eyes. Place the 1/8-inch balls of black fondant on top of the 1/4-inch balls of white fondant.

Gently press the two together.

I see you!

Place the eyeballs on the penguin as shown. They should have no trouble sticking, but if they don’t, warm them in your hands slightly, then try again.

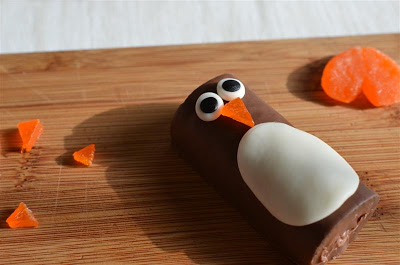
Now place the beak under the eyes, again, it should be sticky enough to hold in place all by itself. We’re almost done.

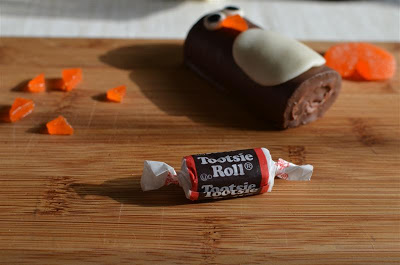
Now it’s time to make the wings. You’ll need one small tootsie roll per penguin.

Cut the tootsie roll in half.

Knead each half into an oblong shape, then flatten each into the shape of a wing. Attach to the sides of the penguin, just below the eyes. The tootsie roll wings don’t stick as easily as the other parts - use the heat of your hands to make sure they’re soft and sticky before attaching.

Place the feet on a bed of snow (sugar) and top with the assembled penguins.
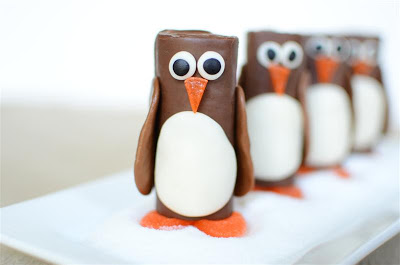
Enjoy!

Two-Tone Ganache Sandwich Cookies

Patricia @ ButterYum

This month's Secret Recipe Club assignment was Vivian's blog Let's Try These.  Vivian and I share a love for baking, so it was hard picking just one recipe to feature today, especially since she has so many yummy options to chose from, but I wanted to find a recipe that I could use with my snowflake cookie cutters.  I settled on Vivian's Two-Tone Cookie Crinkles, a Better Homes and Gardens recipe.  I don't know why they're called crinkles - there's nothing crinkled about them, but they sure are tasty, and they're so fun to make.

Two-Tone Ganache-Filled Snowflake Sandwich Cookies

makes approximately 30 cookies

Printable Recipe

Ingredients

For the cookies:

  • 1 cup butter, softened

  • 1 cup granulated sugar

  • 1 teaspoon baking powder

  • 1/4 teaspoon salt

  • 1 egg

  • 1 teaspoon pure vanilla extract

  • 2 1/4 cups all-purpose flour

  • 1/4 cup unsweetened cocoa powder, sifted

For the ganache filling:

  • 1/2 cup heavy cream

  • 4 ounces high quality semi-sweet chocolate, chopped

Directions

To make the cookie dough:

  1. In the bowl of a stand mixer fitted with the blade attachment, beat the butter on medium high speed for 30 seconds.

  2. Add sugar, baking powder, and salt; beat until combined, scraping bowl as needed.

  3. Add egg and vanilla; beat to combine.

  4. Add flour until incorporated.

  5. Divide dough into two portions; adding sifted cocoa powder to one portion.

  6. Wrap each portion with plastic wrap and chill for 1-3 hours.

  7. Preheat oven to 375F.

  8. Roll each dough portion to 1/8-inch thickness on a lightly floured surface.

  9. Cut out desired shapes with floured cookie cutters, leaving the bottom halves solid.

  10. Place cookies 2-inches apart on ungreased cookie sheet; bake in preheated oven for 8 minutes or until edges are set (tiny cutouts bake for 5-6 minutes).

  11. Transfer cookies to racks and cool completely.

To make Ganache:

  1. Gently heat cream and chocolate together; stirring until completely smooth and combined (I did this in the microwave).

  2. Cover and chill for 30 minutes (or make the ganache several hours in advance and let it sit at room temperature until it reaches the proper spreading consistency).

To assemble cookies:

  1. Spoon about 1 teaspoon of the ganache in the center bottom of each cookie and make a sandwich by adding a decorative top cookie.

  2. Sprinkle with powdered sugar if desired.

  3. To store, place unfilled cookies in an airtight container, separating layers with waxed paper, at room temperature for 3 days or frozen for up to 3 months. Thaw and assemble just before service.

Notes

  • I'm not a fan of rolling cookie dough on a floured surface - the extra flour makes the cookies look messy, and it has a tendency to dry out the dough, making the cookies cut from the re-rolled scraps a lesser quality.  Instead, I prefer to roll my dough between two layers of waxed paper - completely eliminating the need for extra flour and enabling the scraps to be re-rolled over and over again (chilling when needed). 

  • To prevent distortion, I cut my cookie shapes while the dough is still on the waxed paper, then slide the waxed paper onto a cookie sheet and chill for at least 10 minutes before transferring the shapes to a sheet pan. 

adapted from Better Homes and Gardens