contact us

Use the form on the right to contact us.

You can edit the text in this area, and change where the contact form on the right submits to, by entering edit mode using the modes on the bottom right.

Form Block
This form needs a storage option. Double-click here to edit this form, and tell us where to save form submissions in the Storage tab. Learn more
         

123 Street Avenue, City Town, 99999

(123) 555-6789

email@address.com


You can set your address, phone number, email and site description in the settings tab.
Link to read me page with more information.

Blog

Butteryum food blog recipes

Hungarian Shortbread: Tuesdays with Dorie

Patricia @ ButterYum
TWD Hungarian Shortbread - ButterYum

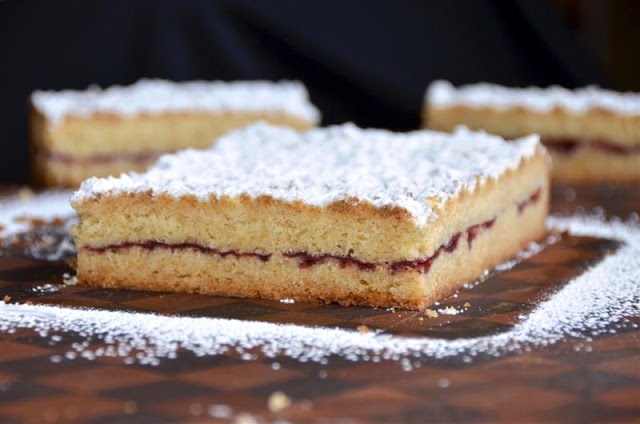
Today I'm thrilled to be joining the Tuesdays with Dorie baking group for the first time.  This group is baking their way through the book Baking with Julia and today's featured recipe is Gale Gand's Hungarian Shortbread (page 327, Baking with Julia by Dorie Greenspan).

This shortbread is delicious, but it's very rich and very sweet.  It's different than other shortbread recipes I've tried - the dough contains egg yolks, it's chilled and grated before being pressed lightly into the baking pan, there's a ribbon of jam baked in the middle, and the shortbread is liberally sprinkled with powdered sugar when it's piping hot out of the oven.  Dorie fills her shortbread with homemade strawberry-rhubarb jam, but I had a jar of sugar-free raspberry preserves to use up.  Glad I chose sugar-free because the shortbread is very sweet.  

I reduced the recipe by half and baked it in an 8-inch square pan.  I should also mention that I goofed and set my oven temp 25F higher than I should have - despite my error, the shortbread tasted wonderful although I'm sure it's a bit darker in color than it should have been (easily camouflaged with a sprinkling of powdered sugar).   

The recipe can be found at the following host blogs: 1 Small Kitchen and The Not So Exciting Adventures of a Dabbler.  If you're interested in joining this baking group and/or would like to visit other blogs who baked along, visit Tuesdays with Dorie.

(affiliate links)

Stuffed Peppers

Patricia @ ButterYum

I have been making these stuffed peppers for as long as I can remember.  The original recipe began as one from the Better Homes and Garden Cookbook, which was the only cookbook my mother owned when I was growing up.  Like most of you probably do, I tweaked and revised the recipe through the years.  My family loves them.  For a fast stove-top version, see my notes below.

Okay, let's make some stuffed peppers.

Start by prepping your peppers.  You don't have to clean the ribs out if you don't want to, but I like to make room for as much yummy filling as possible.  

I use a melon baller to scrape the ribs out - so much easier than trying to use a knife.

See.  Easy peasy.

That took me no more than 5 seconds.

I mince the pepper tops and add them to the filling.

I like extra sharp cheddar, but feel free to use your favorite cheese.  Nestle your peppers in an oven-safe container that will hold them upright.  I used a cast iron skillet today, but sometimes I use a pie plate, a casserole dish, or even a jumbo muffin tin.

Oops, I forgot to get a pic of the cooked ground beef before I added the crushed tomatoes (envision cooked ground beef with flecks of onion and tri-colored peppers).  Now we add the crushed tomatoes, water, rice, and various seasonings.

This is what the mixture will look like before the rice is cooked.

And here is what it looks like after the rice is cooked.  Stir in some of the cheese and we'll be ready to stuff the peppers.

Are you getting hungry yet?

Oh my.  Top them with cheese and pop them into the oven for 20 minutes.

Here we go.  I wish you could smell them!!  My hungry brood is dying to dig in... gotta run!

Items used to make this recipe:

(affiliate links)


Stuffed Peppers

Printable Recipe

makes 6

Ingredients

  • 6 large bell peppers, any color (prepared as directed below)

  • 2 pounds ground beef (or ground turkey)

  • 1 cup chopped onions

  • 1 1/2 teaspoons salt

  • 1/2 teaspoon pepper

  • 28 ounce can crushed tomatoes (or diced tomatoes with their juice)

  • 1 teaspoon dried basil

  • 1/2 teaspoon dried oregano

  • 3 tablespoons A-1 steak sauce (or Worcestershire sauce)

  • 1 cup water

  • 1 cup long grain white rice

  • 6 ounces shredded cheddar cheese (or any good melting cheese)

Directions

  1. Preheat oven to 375F.

  2. To prepare peppers, cut tops off and reserve.

  3. Clean inside peppers by removing seeds and ribs; place in an oven safe pan or casserole dish.

  4. Mince the pepper tops; discard the inedible stems.

  5. In a large saute pan, saute minced pepper tops and onions in a little olive oil until translucent.

  6. Add ground beef, salt, and pepper; cook until beef is brown and cooked through, stirring occasionally to break up clumps.

  7. Drain beef if necessary and add the crushed tomatoes, basil, oregano, A-1, water, and rice; stir well to combine.

  8. Bring mixture to a boil, reduce heat to simmer and cover until rice is soft and has absorbed most of the liquid; about 20 minutes.

  9. Remove from heat and stir in all but half of the shredded shredded cheese.

  10. Spoon mixture into the prepared peppers (extra filling can be stuffed into the spaces between the peppers).

  11. Sprinkle the remaining shredded cheese on top of peppers.

  12. Place on middle rack in oven and bake uncovered for 15-20 minutes, or until the cheese is melted and starts to turn bubbly and brown.

Notes  

  • If you want smaller portions, cut the peppers in half lengthwise and place them cut-side-up on a rimmed half sheet pan before stuffing and baking.  This filling can also be used to stuff cabbage leaves.  Just fill and roll steamed cabbage leaves, then cover with tomato sauce and heat through.

  • For a fast "skillet dinner" version of this recipe, don't plan to stuff the peppers.  Instead, dice the peppers and add them to the meat mixture at the same time you add the rice.  When the rice is cooked, sprinkle the cheese on top, cover and heat just until the cheese melts.  Serve straight from the skillet.