How to make Italian Meringue Buttercream (IMBC)
Patricia @ ButterYum
Italian Meringue Buttercream (or IMBC as it's known in the industry) is easier to make than you think. It's infinitely better tasting than the overly sweet, crusty, gritty frostings made with shortening and powdered sugar that are so often mistakenly called buttercream. This is the real deal - the texture of IMBC is silky smooth, and the flavor is utterly out of this world. I promise, once you try it, you'll never go back.
There are many recipes for IMBC online. Pick one and go for it. Let me show you how easy it is to make.
*this post contains affiliate links

Start by combining the correct amount of water and sugar in a heavy bottomed pan. I make IMBC frequently, so I invested in this nifty copper sugar pot by Mauviel. The pot has a nice pour spout and it heats the syrup very quickly. Copper also helps to reduce the risk of the melted sugar crystallizing.
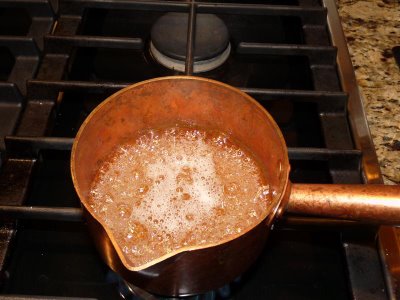
Stir the water and sugar together, just until the sugar dissolves, then STOP stirring and let the mixture come to a boil like this.
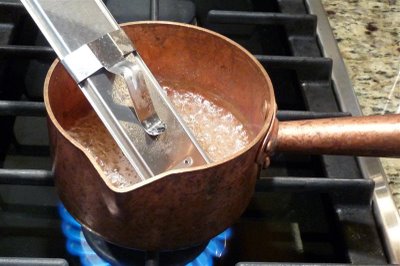
Now add a candy thermometer. The sugar syrup isn't very deep, so I find putting the thermometer in the pan upside down gives a better reading (it allows the tip of the thermometer to sit down in the sugar syrup). You can also tilt the pan, from time to time, to get a good reading, but be careful... the syrup is EXTREMELY HOT!

Cook until the temperature reaches 248 - 250F. As you can see, we're not quite there yet, but it won't be much longer. The temperature rises quickly once you get to this point.

In the meantime, beat cream of tartar and room temperature egg whites (real egg whites, not out of a carton) in the bowl of a stand mixer using the whip attachment on med speed. When the sugar syrup is almost at the target temperature, raise the mixer speed to high and beat whites until stiff peaks are reached.
IMPORTANT - be very sure your mixer bowl and whip are free of all or grease/oil, and make sure there are absolutely no traces of egg yolk in your whites. Greasy residue or the tiniest amount of egg yolk will keep your white from whipping. As an added insurance policy, wipe the bowl and wire whip down with a paper towel that has been dampened with a little white vinegar (no need to rinse).
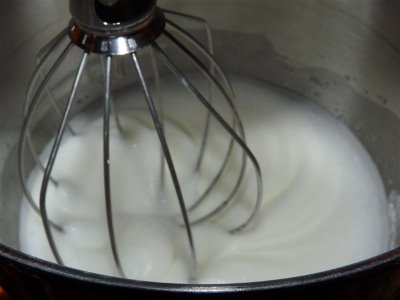
When the egg whites reach soft peaks, add the correct amount of sugar called for in the recipe and continue to beat until stiff peaks are reached. Truth be known, I usually add the sugar all at once before I start beating the egg whites. It’s easier that way and they seem to whip up just as nicely.

Stiff peaks are achieved! If your sugar syrup hasn't reached 248-250F yet, just turn the mixer speed down to low while you wait... you shouldn't have to wait long.

The moment the sugar syrup reaches 248-250F, with the mixer on med-high, start pouring it slowly into the egg whites so the stream of sugar syrup goes between the wire whip and the edge of the bowl. If you pour it onto the wire whip, you'll end up with strings of hardened sugar syrup all over the place. When all the sugar syrup has been added, increase speed to high and beat until the mixture cools to room temperature (monitor the temp by feeling the outside bottom of the bowl). Depending on the size of the batch you're making, this can take anywhere from 10- 25 minutes.

Once the meringue has cooled completely, keep the mixer on and start adding room temperature butter, a little at a time, until it's all combined. The meringue will immediately start to lose volume when you start adding the butter, but that's normal. Also, don't panic if your mixture starts to look curdled... just keep beating on high, it will magically come together soon. If your recipe calls for adding optional flavorings, go ahead and do so. My go to flavor choice is vanilla. I also like mocha and amaretto.

Here it is almost done... I'm making this batch vanilla, so I'll add either pure vanilla extract or vanilla bean paste to taste.

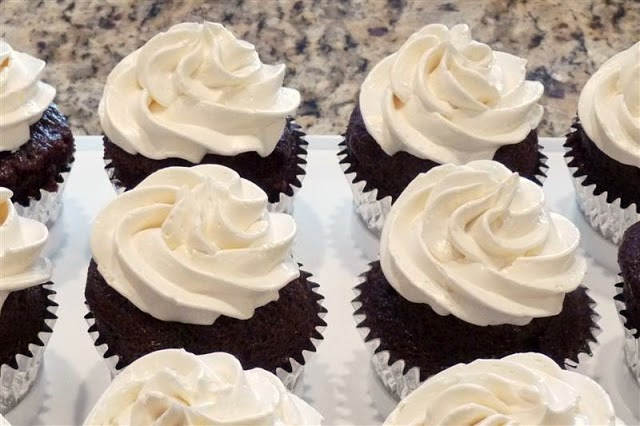
Enjoy!
There are many recipes online, but this one will make 4-5 cups. One batch will frost a layer cake, but you may want to make more if you plan to pipe decorations. Leftover buttercream will keep at room temp for 3 days, can be refrigerated for 10 days, or can be frozen for long-term storage. Bring to room temp before using. Beat for a few seconds with a whisk to restore creamy consistency.
Vanilla Italian Meringue Buttercream
makes 4-5 cups (enough for an 8-inch cake or 24 cupcakes)
Ingredients
5 large egg whites (150g)
1/4 teaspoon cream of tartar
1 1/4 cups granulated sugar (250g)
1/4 cup water
1 1/2 teaspoons pure vanilla extract (definitely use the good stuff here)
1 pound unsalted butter, room temperature (454g)
Directions
In a small, heavy bottomed sauce pan, make the sugar syrup by heating the water and sugar to 248-250F (this will take 5-10 minutes).
While the sugar syrup is heating, whip the egg whites on medium speed in the bowl of a stand mixer until soft peaks form. Be sure the bowl has no traces of fat (oil, butter, egg yolks, etc).
Shortly before the sugar syrup reaches the target temperature, increase the mixer to high and whip whites to stiff peaks (turn off mixer if the sugar syrup hasn't reached 248-250F yet).
When the sugar syrup is ready, lower the mixer speed to low and carefully pour the hot syrup into the whipped egg whites - pour just between the sides of the bowl and the whisk, being careful not to allow the syrup to hit the spinning whisk.
Increase the mixer speed to high and whip until the meringue has cooled completely (check by feeling the bottom of the bowl).
Once the meringue has cooled completely, slowly add the butter, 1 tablespoon or so at a time, until all the butter is fully incorporated. If the mixture starts to look curdled or "broken", see notes below.
Beat in the pure vanilla extract and prepare to indulge!!
Notes
A thermometer is essential - use either a candy thermometer or a digital instant read thermometer.
Do not place the thermometer in the sugar syrup until the sugar has completely dissolved (to prevent recrystallization). Also, while the sugar syrup is heating, you may wish to periodically wash the sides of the saucepan down with a silicone pastry brush dipped in water to prevent splashes from recrystalizing on the sides of the pan (which can make the entire batch of sugar syrup crystallize).
Use egg whites from shelled eggs, not egg whites from a carton (they do not whip well).
Be sure to use unsalted butter.
Buttercream should be served at room temperature.
Buttercream will develop tiny air bubbles upon standing so you may need to rewhip it occasionally to restore its smooth consistency.
To tint, use gel or paste colors for best results.
Butter is yellow so real buttercream will have a slightly yellow-ish cast, but the more air you whip into it, the whiter it will look. You may choose to flavor your buttercream with clear vanilla extract. For very white buttercream, you may choose to add bright white food coloring (also recommended to keep some shades, like pink or blue, from looking orange or green).
Be sure the egg white and sugar syrup mixture (aka meringue) has cooled completely before you start adding the butter. You can speed this process along by attaching a water jacket filled with ice to the stand mixer. If you don’t have a water jacket attachment, try placing bags of frozen vegetables around the outside of the bowl.
When adding the butter, If the mixture looks curdled or "broken" at any time, don’t panic - continue beating until it smooths out before adding more butter (if the mixture or your kitchen is too warm, a short rest in the fridge may be necessary).
Store Italian Meringue Buttercream in an airtight container at room temperature for up to 3 days, chill for up to 10 days, or freeze for up to a year. Frozen buttercream should be thawed in the refrigerator overnight. Chilled buttercream should be allowed to reach room temperature and rewhipped to restore consistency before using.