contact us

Use the form on the right to contact us.

You can edit the text in this area, and change where the contact form on the right submits to, by entering edit mode using the modes on the bottom right.


123 Street Avenue, City Town, 99999

(123) 555-6789

email@address.com


You can set your address, phone number, email and site description in the settings tab.
Link to read me page with more information.

Blog

Butteryum food blog recipes

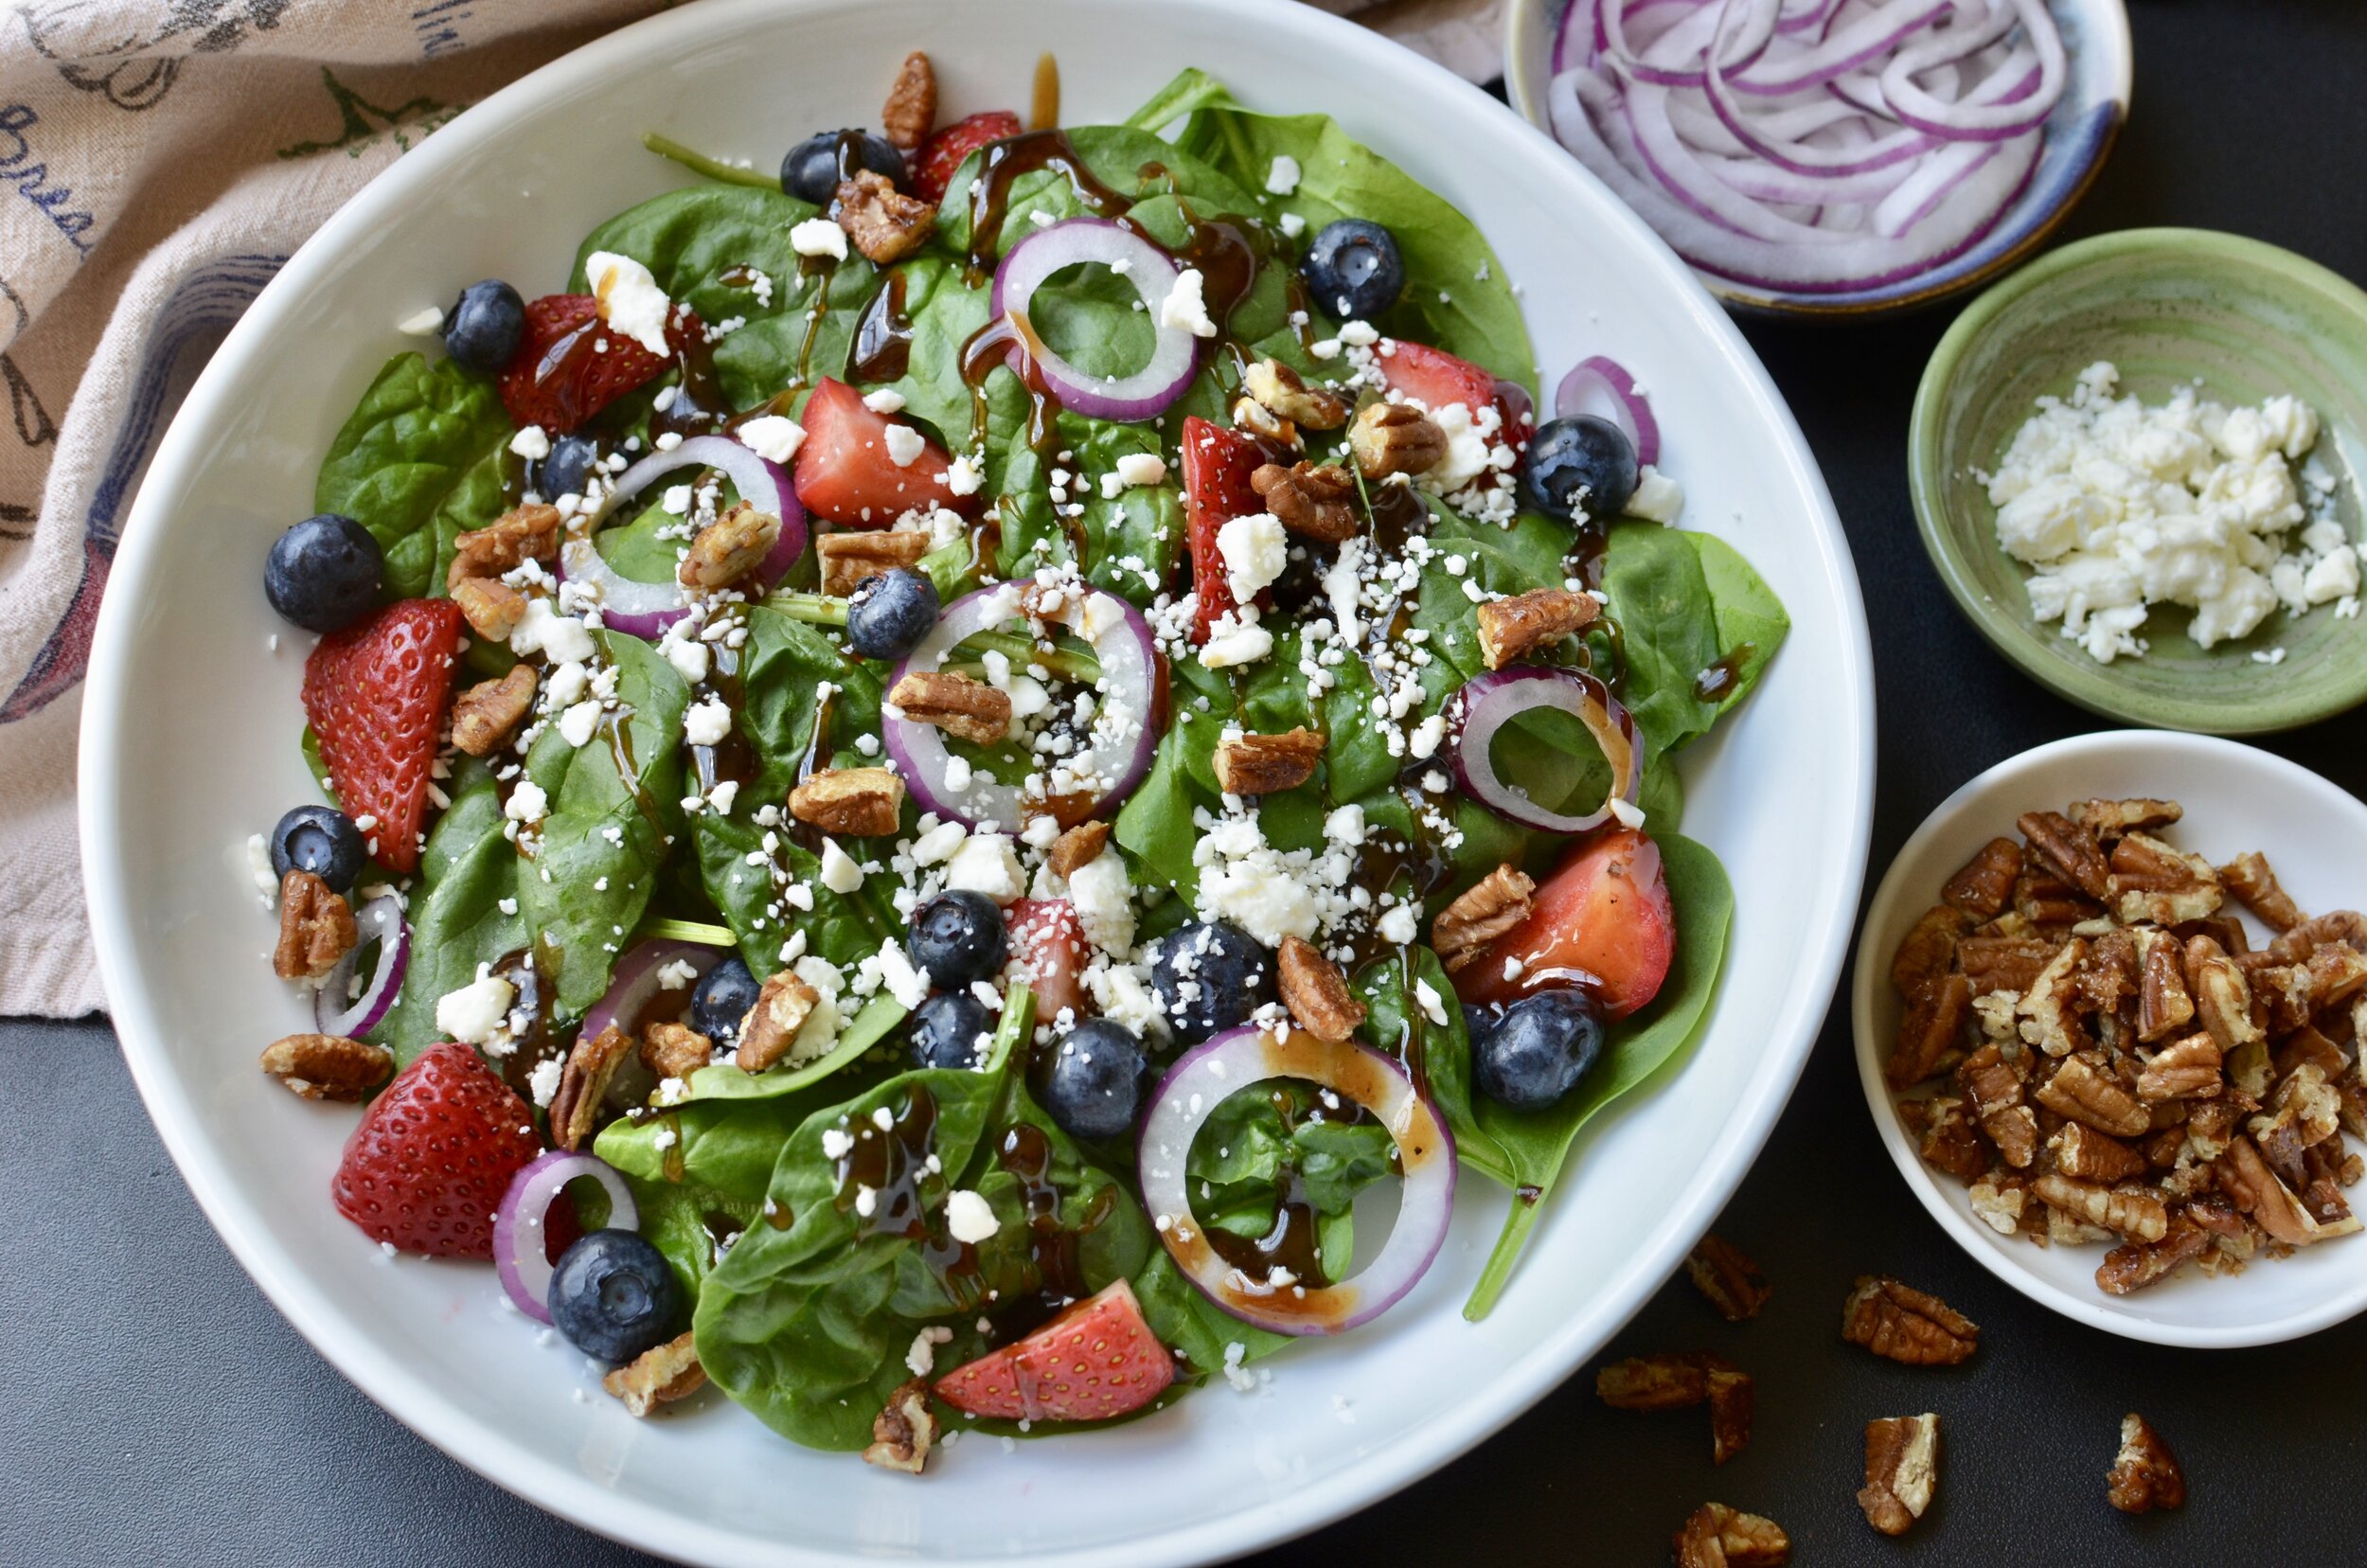
Spinach Salad with Berries and Balsamic Dressing

Patricia @ ButterYum

The best spinach salad recipe with balsamic reduction.  blueberry and strawberry spinach salad recipe.

A few years ago Jaclyn from Cooking Classy shared my To Die For Banana Cake with Vanilla Bean Frosting recipe with her peeps. So, today, I’m returning the favor by sharing one of her recipes with my peeps. I’ve done a slight variation by 1) adding blueberries - because I got my hands on the most amazing blueberries from NJ, and 2) I increased the number of candied pecans - because they’re completely addictive and extras are so very good for snacking!, and 3) I’ve included a quick way to reduce the heat of raw onions - because I like ‘em, but I don’t like their bite!

DSC_2202.JPG
DSC_2205.JPG
fullsizeoutput_3fde.jpeg

Items used to make this recipe:

(affiliate links)


Spinach Salad w/Berries and Balsamic Dressing

makes 8 servings

Printable Recipe

Ingredients

Dressing:

  • 1/2 cup balsamic vinegar

  • 1/2 cup fruity olive oil (or any mild/neutral oil)

  • 1 tablespoon honey

  • 1 tablespoon dijon mustard

  • 1/2 teaspoon kosher salt

  • 1/4 teaspoon freshly ground black pepper

Candied Pecans:

  • 1 cup roughly chopped pecan pieces

  • 2 tablespoons brown sugar

  • 2 teaspoons butter

Salad:

  • 10 ounces baby spinach leaves

  • 1/2 pound sliced strawberries

  • 1/2 pound fresh blueberries

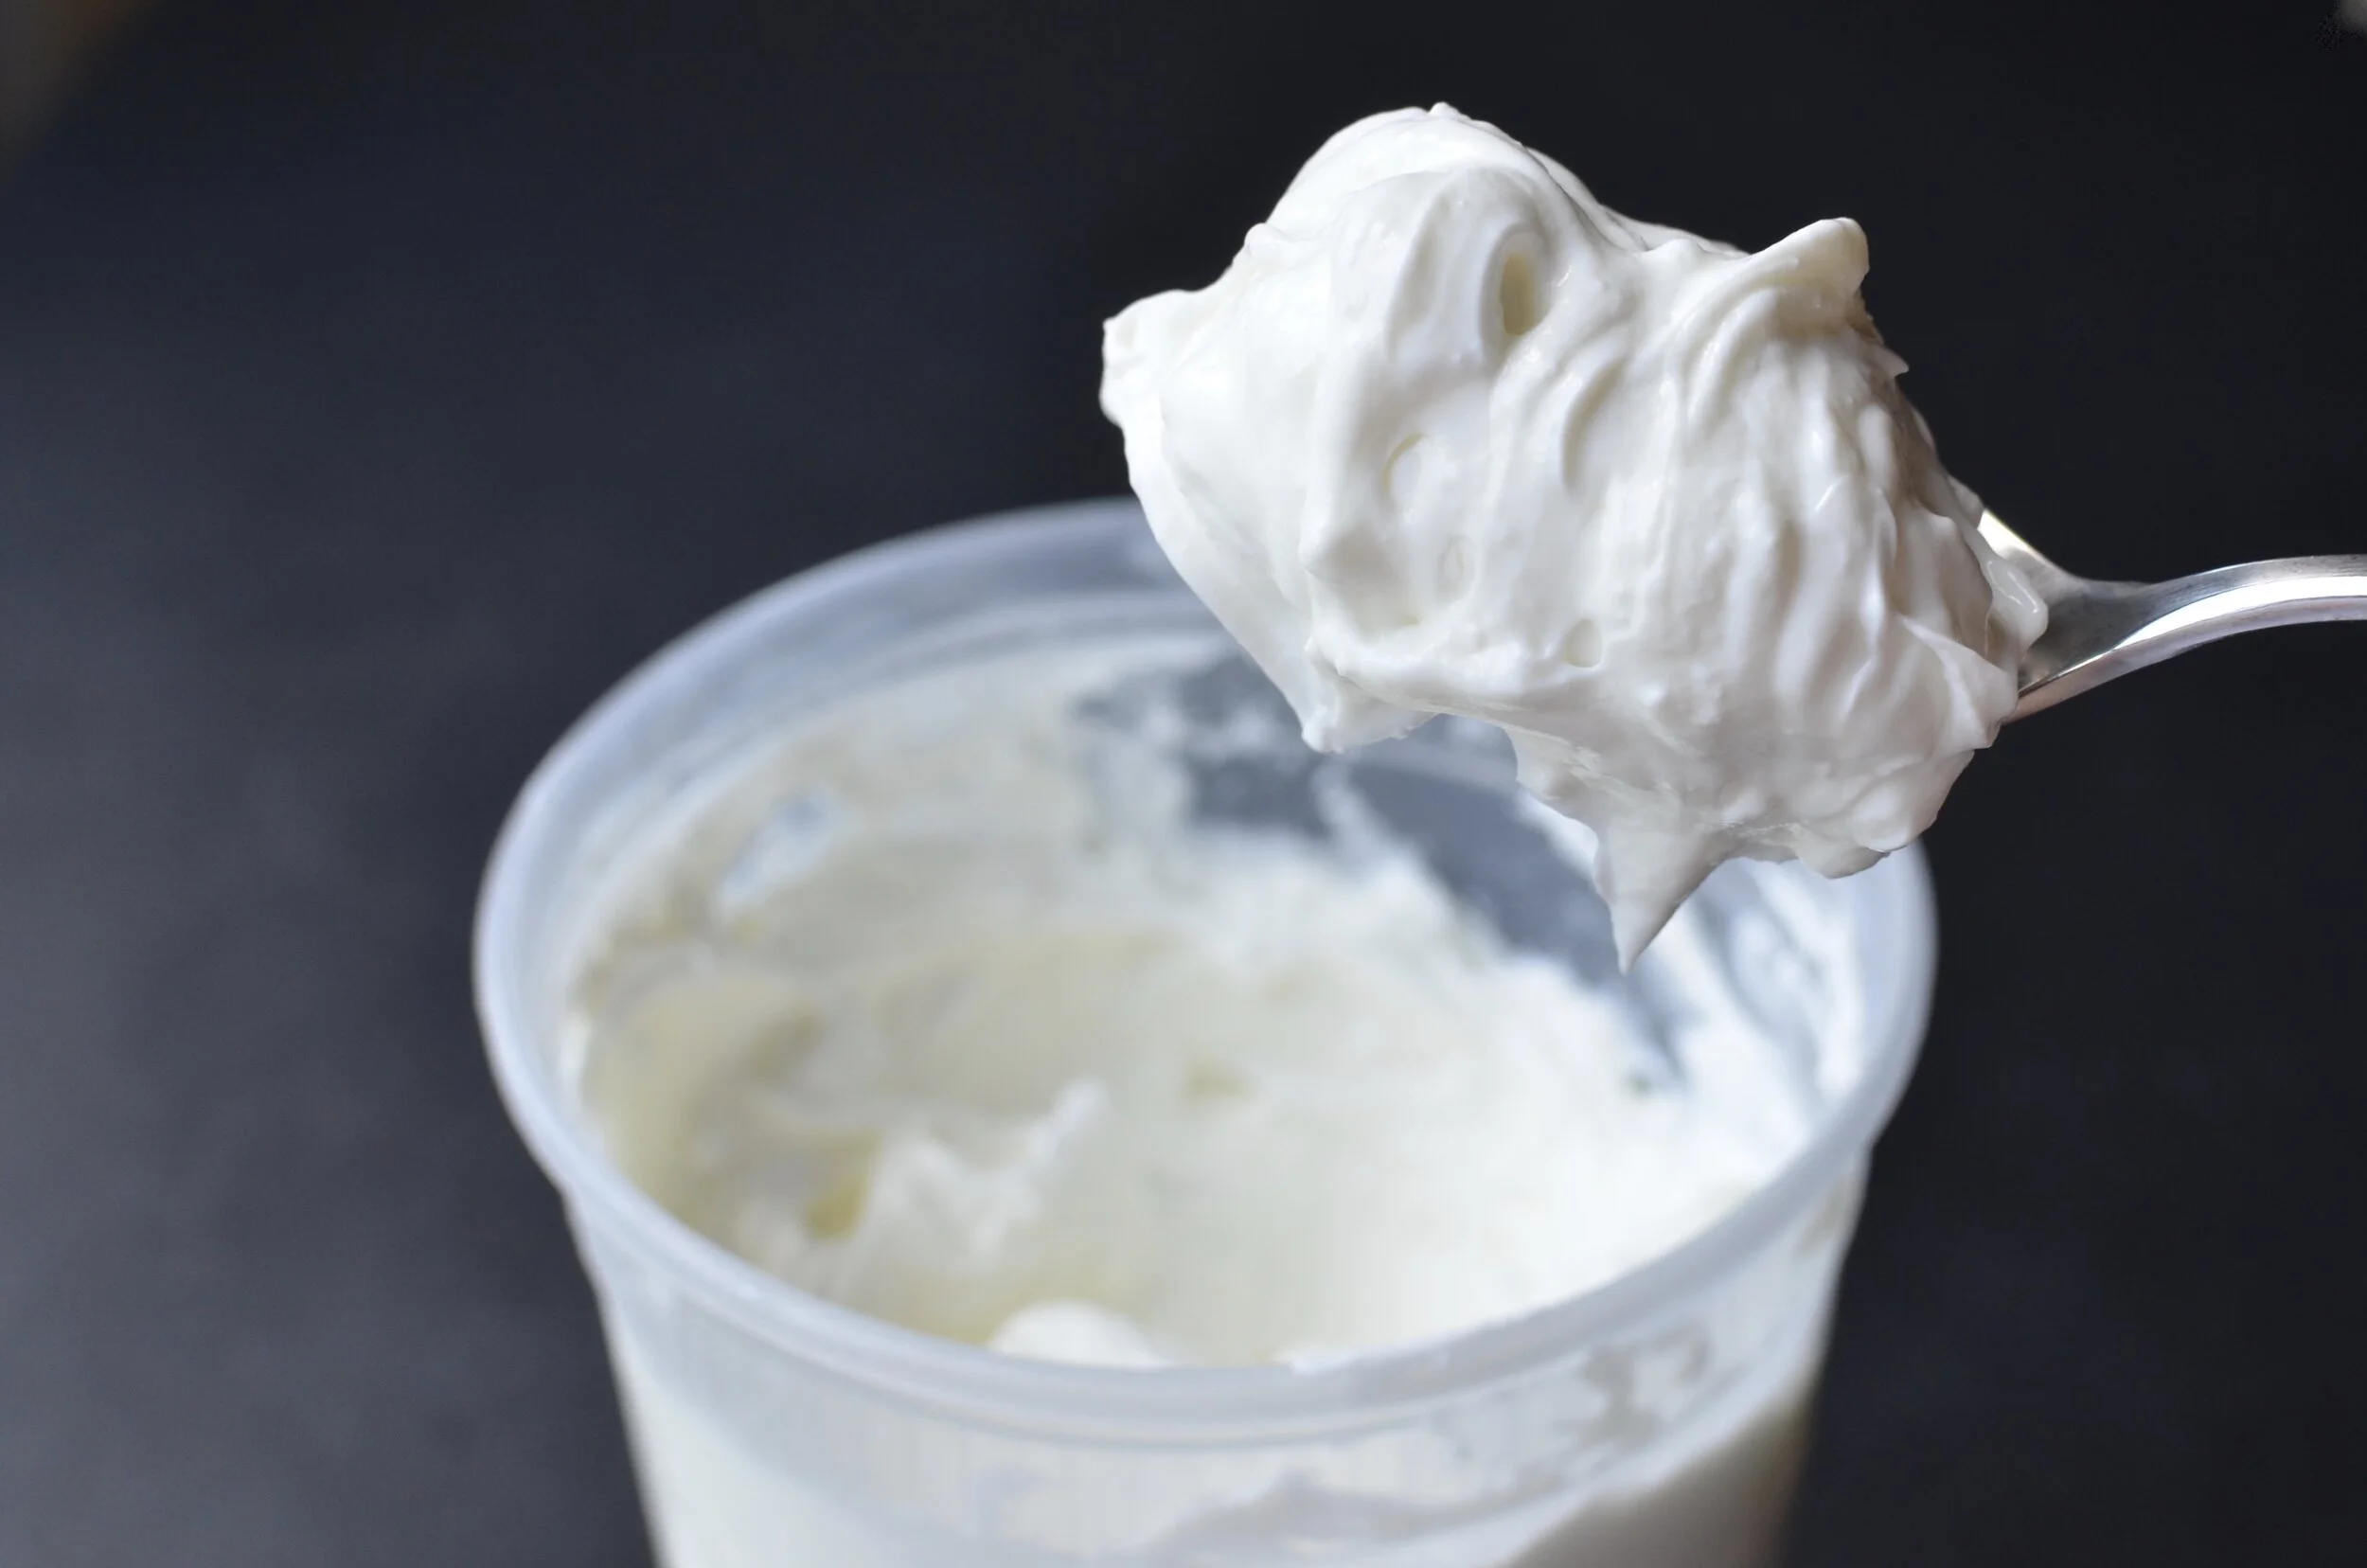
  • 4 ounces crumbled feta cheese

  • 3 ounces red onion, thinly sliced (see notes below)

Directions

To prepare the onions:

  1. combine one cup of water with 1 tablespoon of baking soda; stir well until the baking soda dissolves.

  2. Use a mandolin slicer or a very sharp knife to slice the onions into 1/8-inch thick slices and place them in the baking soda solution for 15 minutes.

  3. Rinse well with cold water before using.

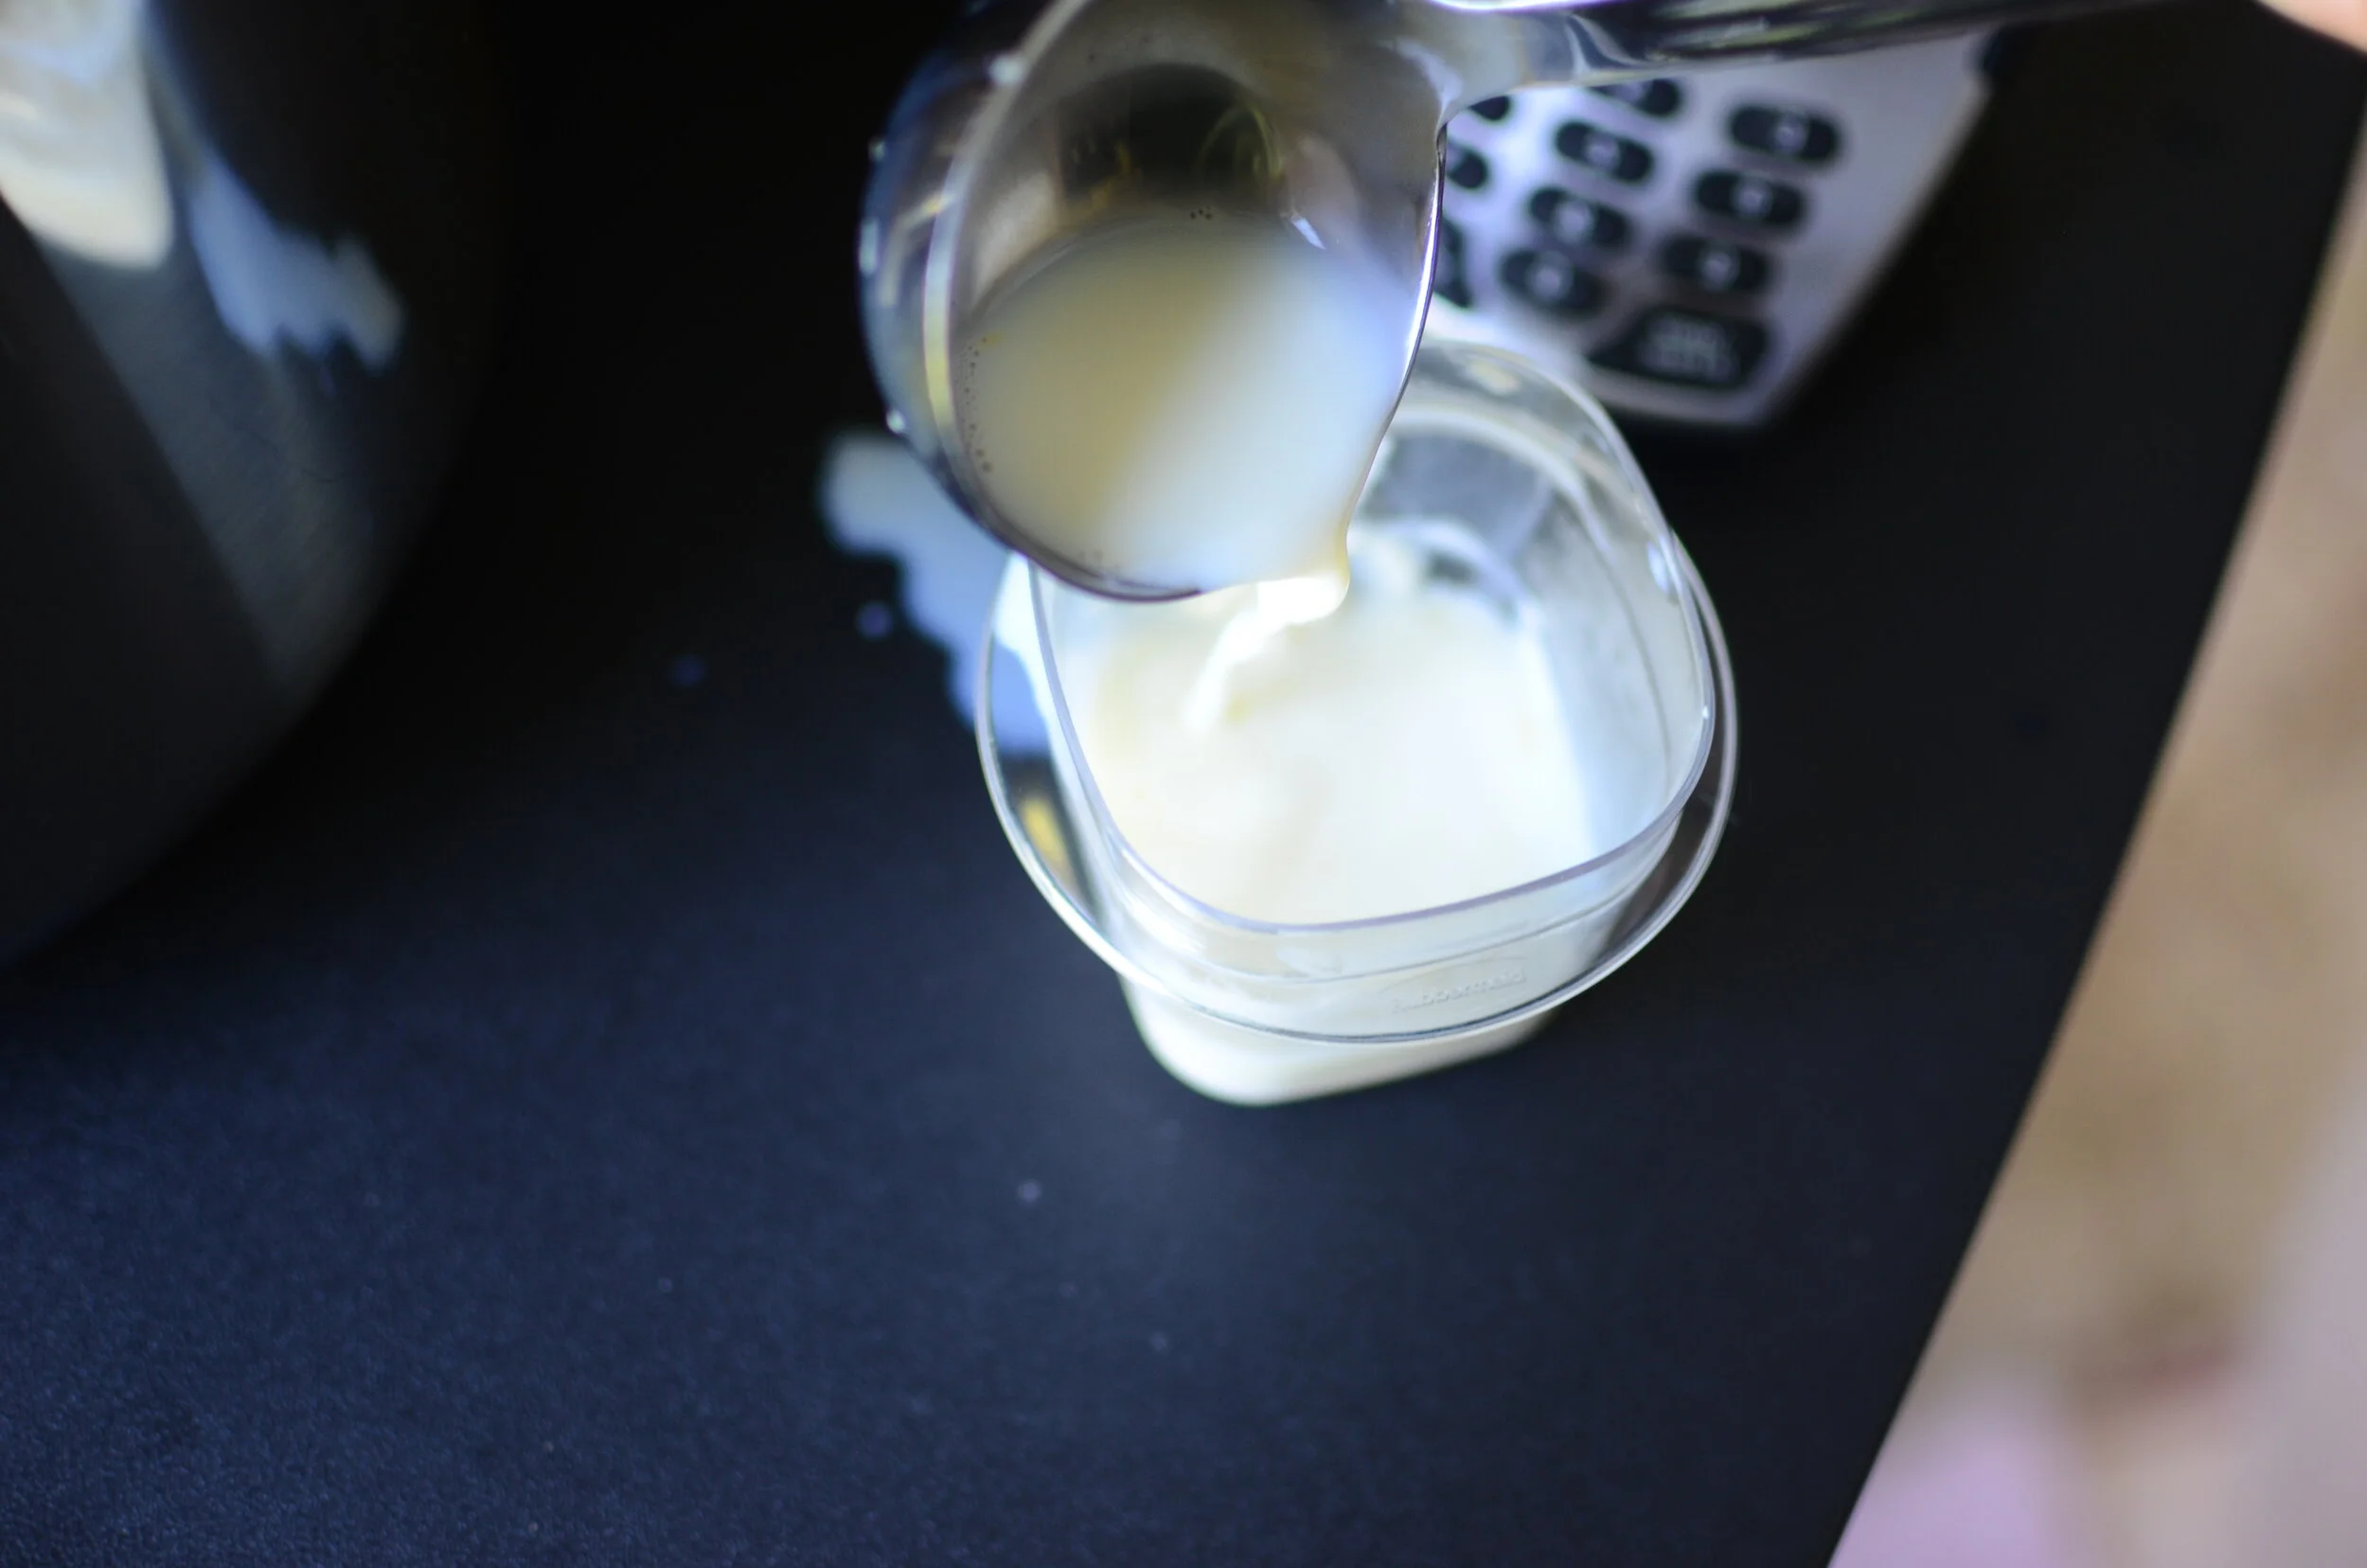
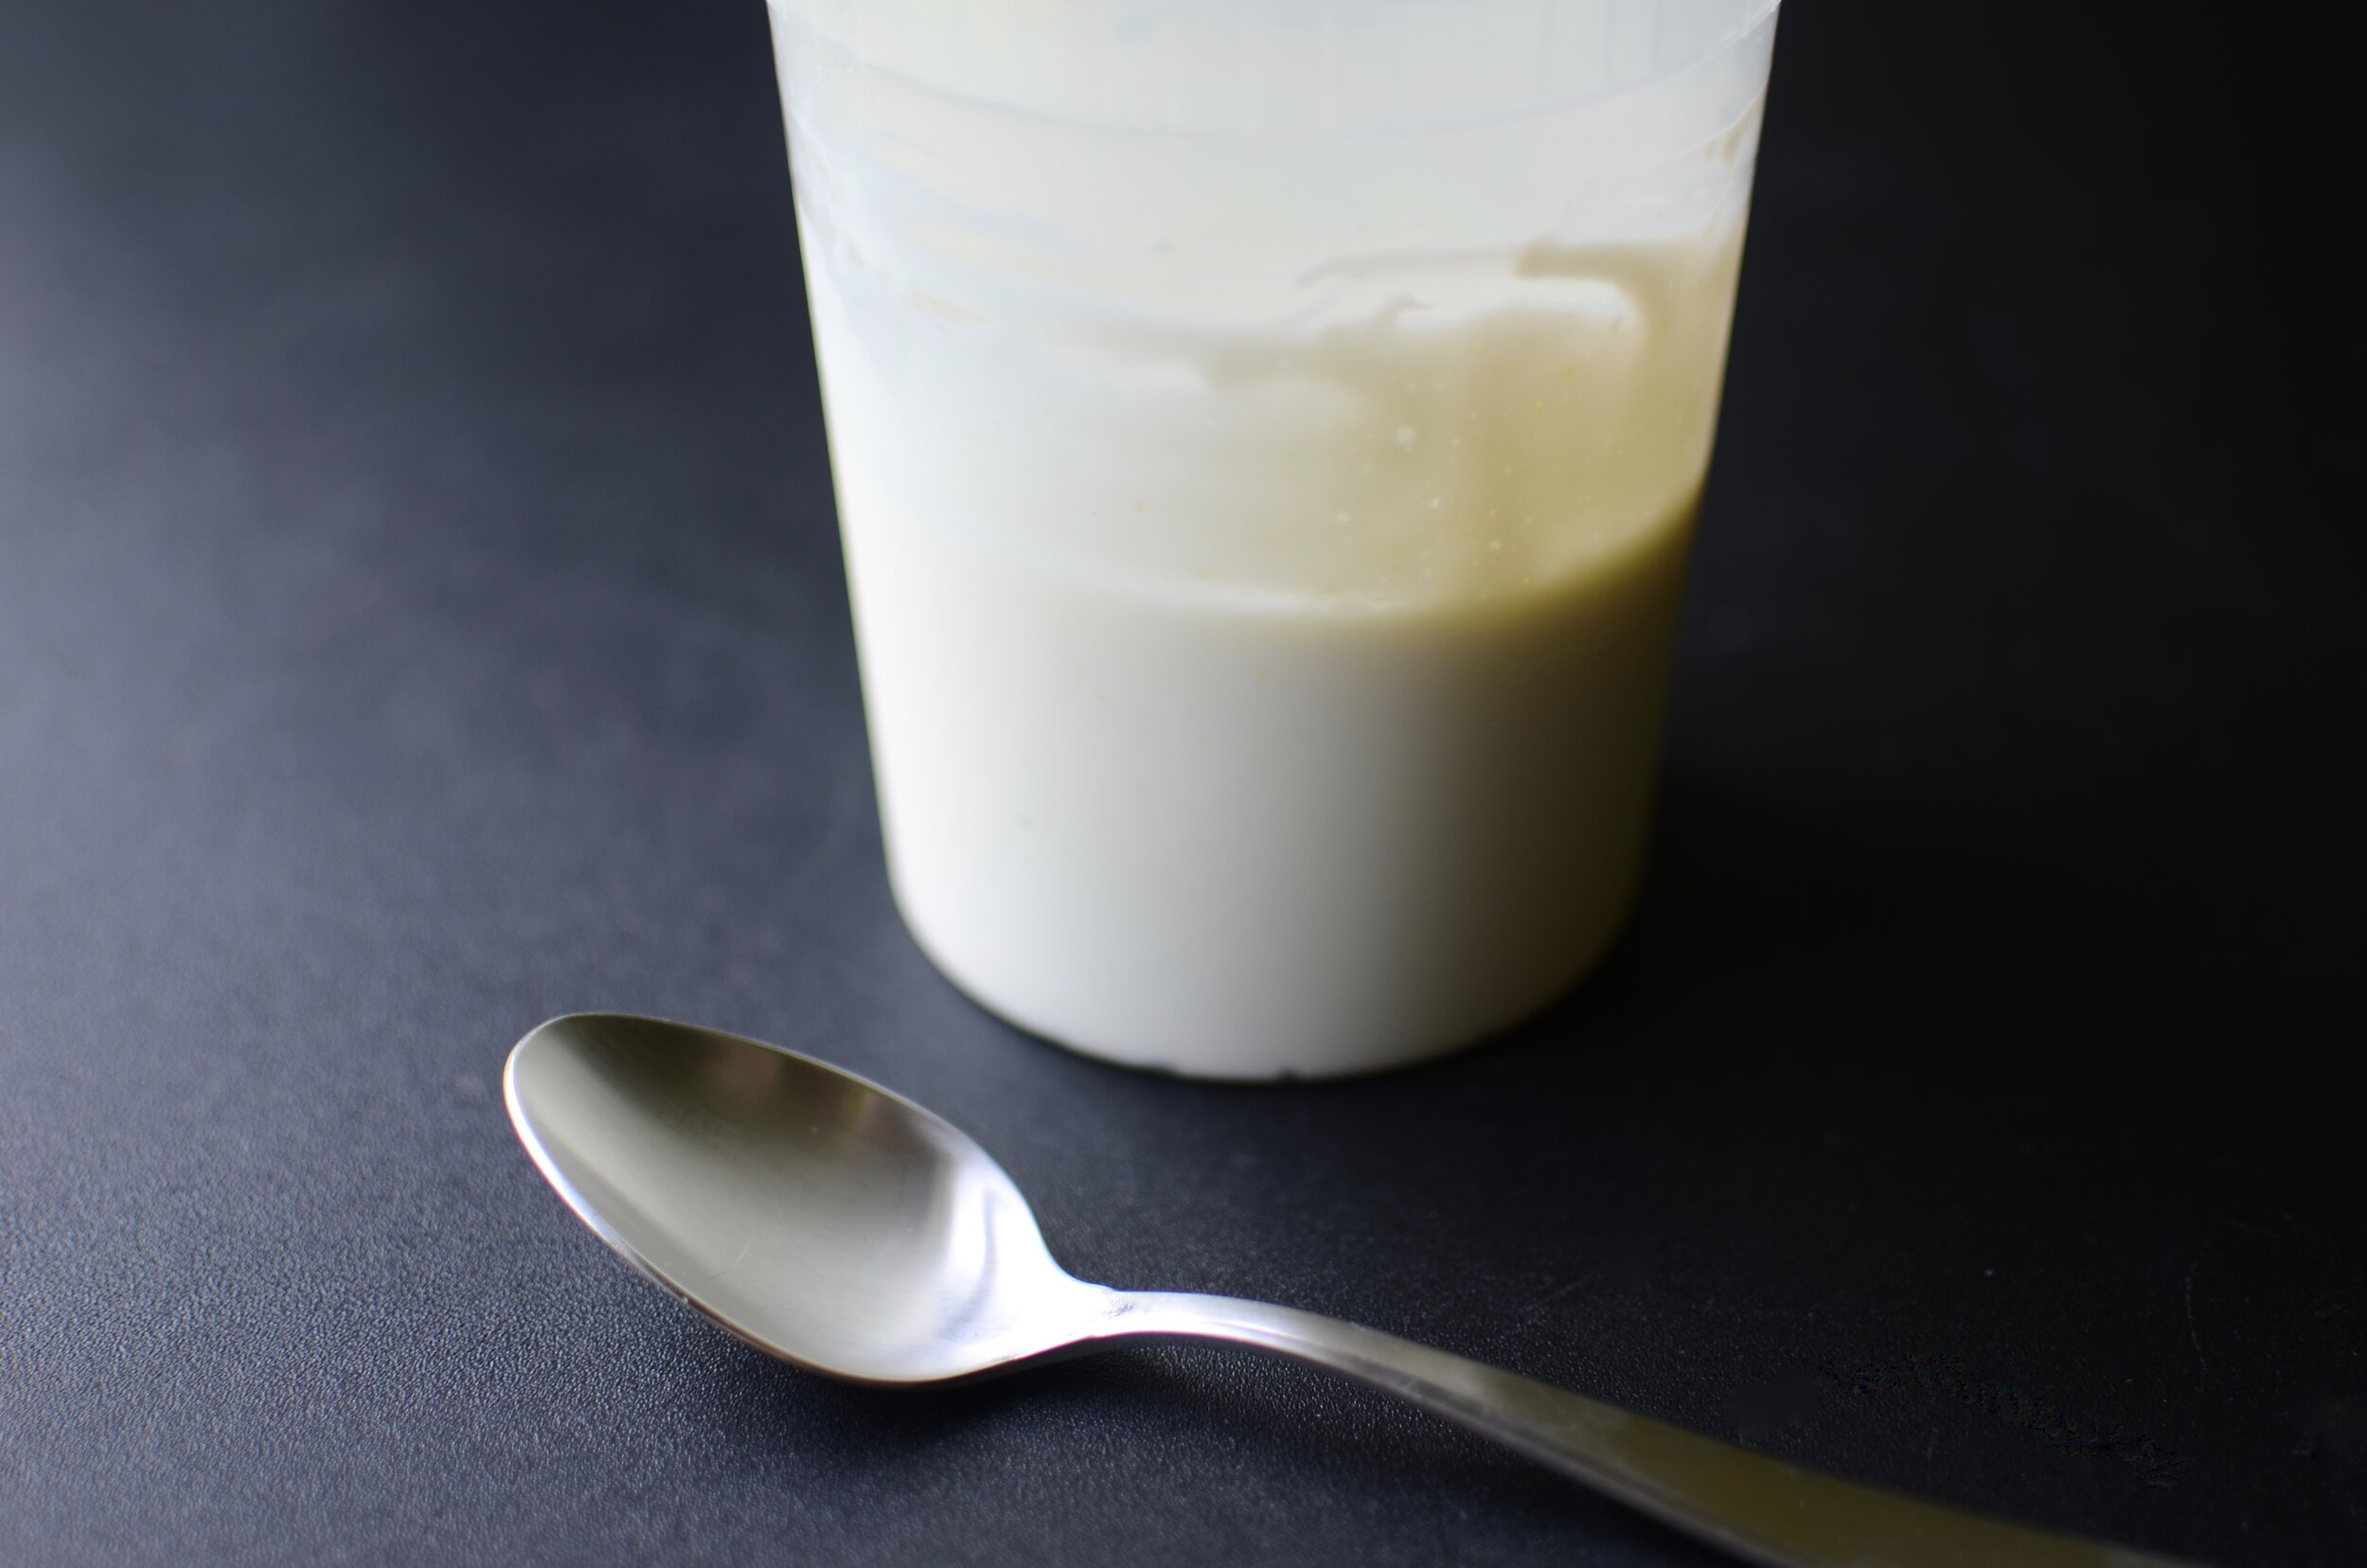
To make the dressing:

  1. in a small, heavy-bottomed saucepan over medium-high heat, reduce the balsamic vinegar to 1/4 cup; remove from heat.

  2. Combine the reduced balsamic, oil, honey, dijon mustard, salt, and pepper; whisk until fully combined (dressing will be thick). Set aside until needed.

To make the pecans:

  1. In a large nonstick skillet over medium-high heat, stir the butter, brown sugar, and pecan pieces constantly until the butter and sugar coat the pecans and the smell of caramelized sugar fills the air (about 3 minutes).

  2. Transfer the pecans to a silicone or parchment lined sheet pan, spreading them out into an even layer, and allow them to cool completely.

To assemble the salad:

  1. Just before serving, arrange the spinach leaves in a large salad bowl.

  2. Evenly distribute the onions, berries, candied pecans, and feta over the spinach..

  3. Drizzle some of the dressing all over the top for presentation and serve the remaining dressing on the side.

Notes

  • To reduce the bite of raw red onions, soak thinly sliced onions for 15 minutes in a solution of 1 tablespoon baking soda per 1 cup of water, then rinse well before using. This method was deemed the best by Cook’s Illustrated:  

    • “… (the) vinegar soak did rid the onions of much of their burn, but it was replaced by an equally strong sour taste, even after thorough rinsing. Milk was also very effective at removing the sulfur compounds, but it left the onions tasting washed-out. The best method—better than even plain water—was our own: a baking-soda solution (1 tablespoon per cup of water). Unlike the other methods, which merely do their best to leach away the offending sulfur compounds, the alkaline baking soda neutralizes sulfenic acid, the immediate precursor to the harsh-tasting thiosulfinates, and prevents them from forming in the first place. Just be sure to rinse the onions thoroughly before using to remove any soapy baking-soda taste.”

  • Leftover dressing keeps beautifully in the refrigerator, for up to a week, in an airtight container.

  • Be sure to use either a fruity olive oil or an oil with a neutral flavor (canola, safflower, etc). The first time I made this dressing, I used a very bold and peppery Spanish olive oil which overpowered the dressing.

  • Feel free to use all strawberries or all blueberries instead of mixing the two.

  • If you must, you can use a 2-cup glass measure and the microwave to reduce the balsamic vinegar, but the hot vinegar smell will be very intense so I strongly recommend reducing the vinegar in a saucepan on the stovetop with the fume fan on high.

  • To make ahead, store all the components in separate containers in the refrigerator (except the candied pecans - store those at room temperature); toss together just before serving.

adapted from cooking classy

Instant Pot Greek Yogurt

Patricia @ ButterYum

InstantPotGreekYogurtRecipe-ButterYum

Let me show you how easy it is to make amazing Greek Yogurt at home, using an Instant Pot. Oh, and it’s super inexpensive!!

fullsizeoutput_3f69.jpeg

Heat a quart of milk in the Instant Pot’s inner pot (I like to use whole milk, but lower-fat milk will work too) and put the lid on - it doesn’t matter if the vent is set to the “sealing” or “venting” position because the milk will never be cooked under pressure.

Press the “yogurt” button until the work “boil” appears. Walk away and let the IP do its thing. You’ll hear a beep at the end of the cycle indicating the milk has been heated sufficiently (about 25 minutes in my model).

how to make Greek Yogurt in the Instant Pot

A quick temperature check to make sure the milk has reached a temperature of between 180-185F. If not, press the “cancel” button, then press the “sauce” button and heat milk until it reaches the proper temperature.

instanpot Greek Yogurt recipe

Now allow the heated milk to cool until it reaches a temp of 105-115F. This will take about 35 minutes if you remove the inner pot from the instant pot. Some people like to speed the process along by sitting the inner pot in an ice water bath, but that’s too much trouble for me. I just set a timer for 35 minutes and I’m good to go.

fullsizeoutput_3f6d.jpeg

Now that the milk has cooled to the right temp, it’s time to inoculate the milk with Greek Yogurt containing “live and active cultures”. I’m using Kirkland brand from Costco today, but I’ve also used Fage brand. Just check the label to see if those live and active cultures are present.

Inoculating milk with greek yogurt culture

To inoculate the milk, you’ll need a ratio of 1 tablespoon of yogurt to 1 quart of milk. Place the yogurt in a small container (note to self - round is better than square). Add a bit of the warm milk and whisk until completely smooth.

how to make greek yogurt in the instant pot

Whisk, whisk, whisk.

insta pot Greek Yogurt recipe

Add the smooth milk/Greek Yogurt mixture to the rest of the warm milk and stir well to evenly distribute all those cultures.

DSC_1583.JPG

Place the inner pot back into the Instant Pot and cover with the lid (again, doesn’t matter what position the vent is on). Press the “yogurt” button until a time of 8 hours is set. If you like your yogurt on the tangy side, you can let it go for up to 10 hours. Personally, 8 hours is perfect for me.

how.to.strain.homemade.greek.yogurt_butteryum
how.to.strain.homemade.greek.yogurt.recipe
fullsizeoutput_3fe5.jpeg
fullsizeoutput_3fe7.jpeg

After 8-10 hours, it’s time to strain the yogurt. To do this, I line a mesh colander with a clean linen towel (a few layers of cheesecloth can also work, but I feel you lose some of the finished yogurt to the cheesecloth). Place the lined colander into a bowl that allows several inches of space between the bottom of the bowl and the bottom of the colander. If necessary, wrap the colander/bowl with a layer or two of plastic to prevent the yogurt from picking up any odors/flavors from the fridge. Allow to drain overnight.

fullsizeoutput_3fd8.jpeg

The next morning your Greek Yogurt is ready to enjoy. If you like it super thick, let the whey drain for up to 24 hours.

DSC_1613.JPG

This is the whey that drained from the Greek Yogurt. You can stir some of it back into the yogurt if you let it drain too much, or there are a gazillion uses for it - just do a google search for ideas.

draining.yogurt.without.cheesecloth

And this is why I prefer to use a linen kitchen towel to drain the yogurt instead of cheesecloth. You can capture just about every single bit of yogurt by using an plastic bench scraper to scrape the yogurt off of the towel.

Hint: Either wash the linen towel right away or rinse it extremely well and allow it to dry before placing in with the dirty laundry. Otherwise, it will turn sour and smell horrible.

fullsizeoutput_3f6e.jpeg

Store the yogurt in an airtight container for up to a week, but don’t forget to save some to make the next batch of yogurt (see notes below).

How to make Greek Yogurt at home using your Instant Pot

Enjoy!

Items used to make this recipe:

(affiliate links)


Instant Pot Greek Yogurt

makes 1 quart

Printable Recipe

Ingredients

  • 1 quart whole milk (pasteurized or raw)

  • 1 tablespoon Greek yogurt (with live and active cultures)

Directions

  1. In and instant pot that has a “yogurt” button, place milk into inner pot.

  2. Cover instant pot and press yogurt button until “boil” appears; when done, milk temperature should be 180-185F (if not, hit cancel button, followed by sautés button and heat until milk reaches the correct temperature.

  3. Allow milk to cool until the temperature reaches 105-115F.

  4. Whisk Greek Yogurt into milk and cover instant pot.

  5. Press the yogurt button until hours show on the display; use the +/- buttons to adjust the time for 8-10 hours (8 less tangy; 10 more tangy).

  6. Uncover instant pot and transfer yogurt to a sieve lined with cheesecloth (or a clean linen towel) suspended over a bowl to catch the whey that will drain out of the yogurt; cover with plastic wrap and strain for several hours or overnight in the refrigerator.

  7. Store in an airtight container in the refrigerator for 1-2 weeks.

Notes

  • I cook 1 quart of milk at a time so I usually start about 9 hours before I go to bed - that way my Greek Yogurt can drain in the fridge overnight. With a large enough Instant Pot, you can scale the recipe up to a gallon of milk, but it will take a bit longer for the milk to come up to temperature and cool down before you can inoculate it with the yogurt cultures.

  • You can reuse your new batch of greek yogurt to make the next batch.

  • If your yogurt drains too much, simply whisk some of the whey back into the mixture.

  • I used whole milk, but 2% and skim milk work as well - whole milk will produce a richer, creamier yogurt.

  • Yes, you can use raw milk (the milk will be cooked to a safe temperature during the “boil” phase of the recipe). If the raw milk has a layer of cream, you’ll end up with clumps of clotted cream in your finished Greek Yogurt (not a bad thing in our house!).

  • When straining the yogurt, be sure to cover well with plastic to prevent it from picking up any stray flavors that may be lingering in the refrigerator.

  • Ways to use whey - you can drink the leftover whey, add it to bread dough, use it to cook potatoes or grains, add it to smoothies, feed it to your pets, add it to your compost, etc… you can find a lot of uses if you do a google search.